
Appearance
User guide
This guide walks through Venuesmith from signing up to seeing how your posts perform. The screenshots come from The Pillar & Post, a made-up pub in Edinburgh, so your screens will show your own venue, posts and photos. Click any screenshot to see it full size.
Create your account
Go to venuesmith.com/signup and fill in your name, your venue or business name, your email address and a password of at least 8 characters, then click Create account.
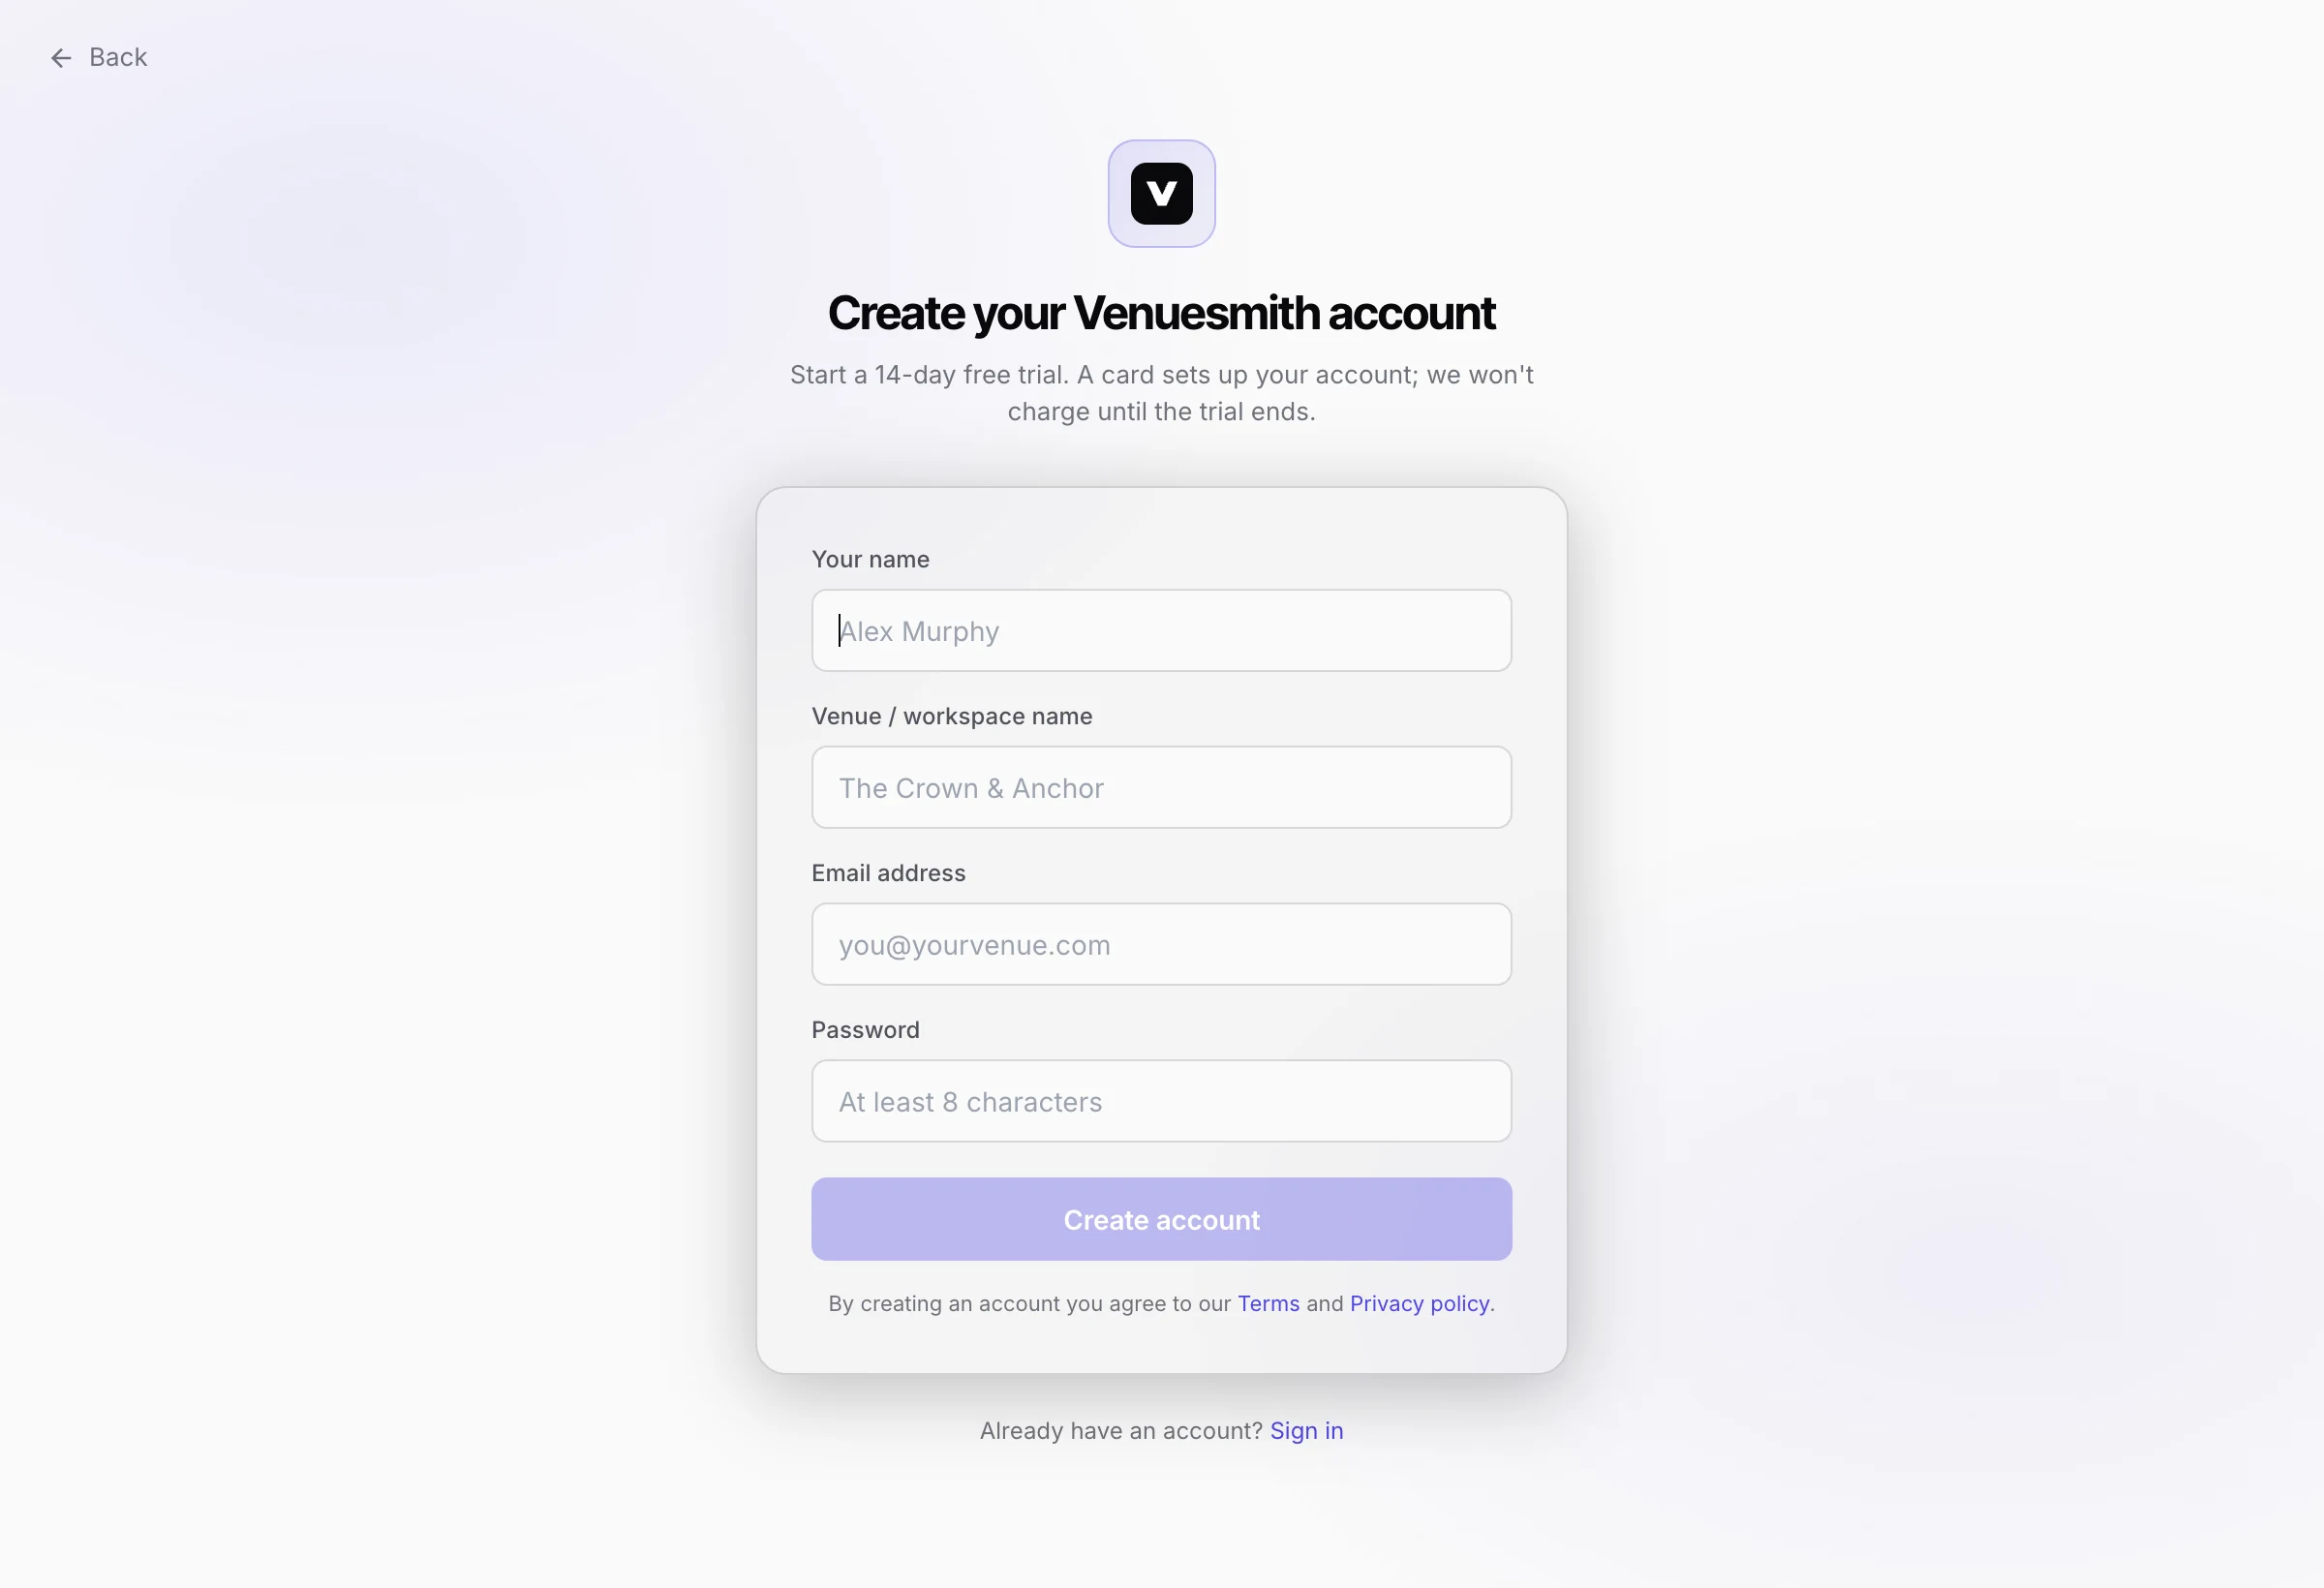
You get a 14-day free trial. The next screen asks for a card through Stripe, and nothing is charged until the trial ends. After that you sign in at venuesmith.com/signin with your email and password, or ask for a sign-in link by email if you'd rather not type the password.
Add your venue
Each venue you post for is a location, with its own logo, brand voice, photos and Instagram account. Click Add your first location on the dashboard (or + New location on the Locations page) and work through the four steps:
- Basics: the location name, a short URL slug, the country code and the city.
- Brand voice: pick a tone (Friendly, Classy, Cheeky, Professional, or Custom to write your own), then add any banned words and signature phrases. You can skip this and fill it in later.
- Templates: the post designs this location can use. Leave them all ticked unless you know you won't want one.
- Confirm: check the summary and click Create location.
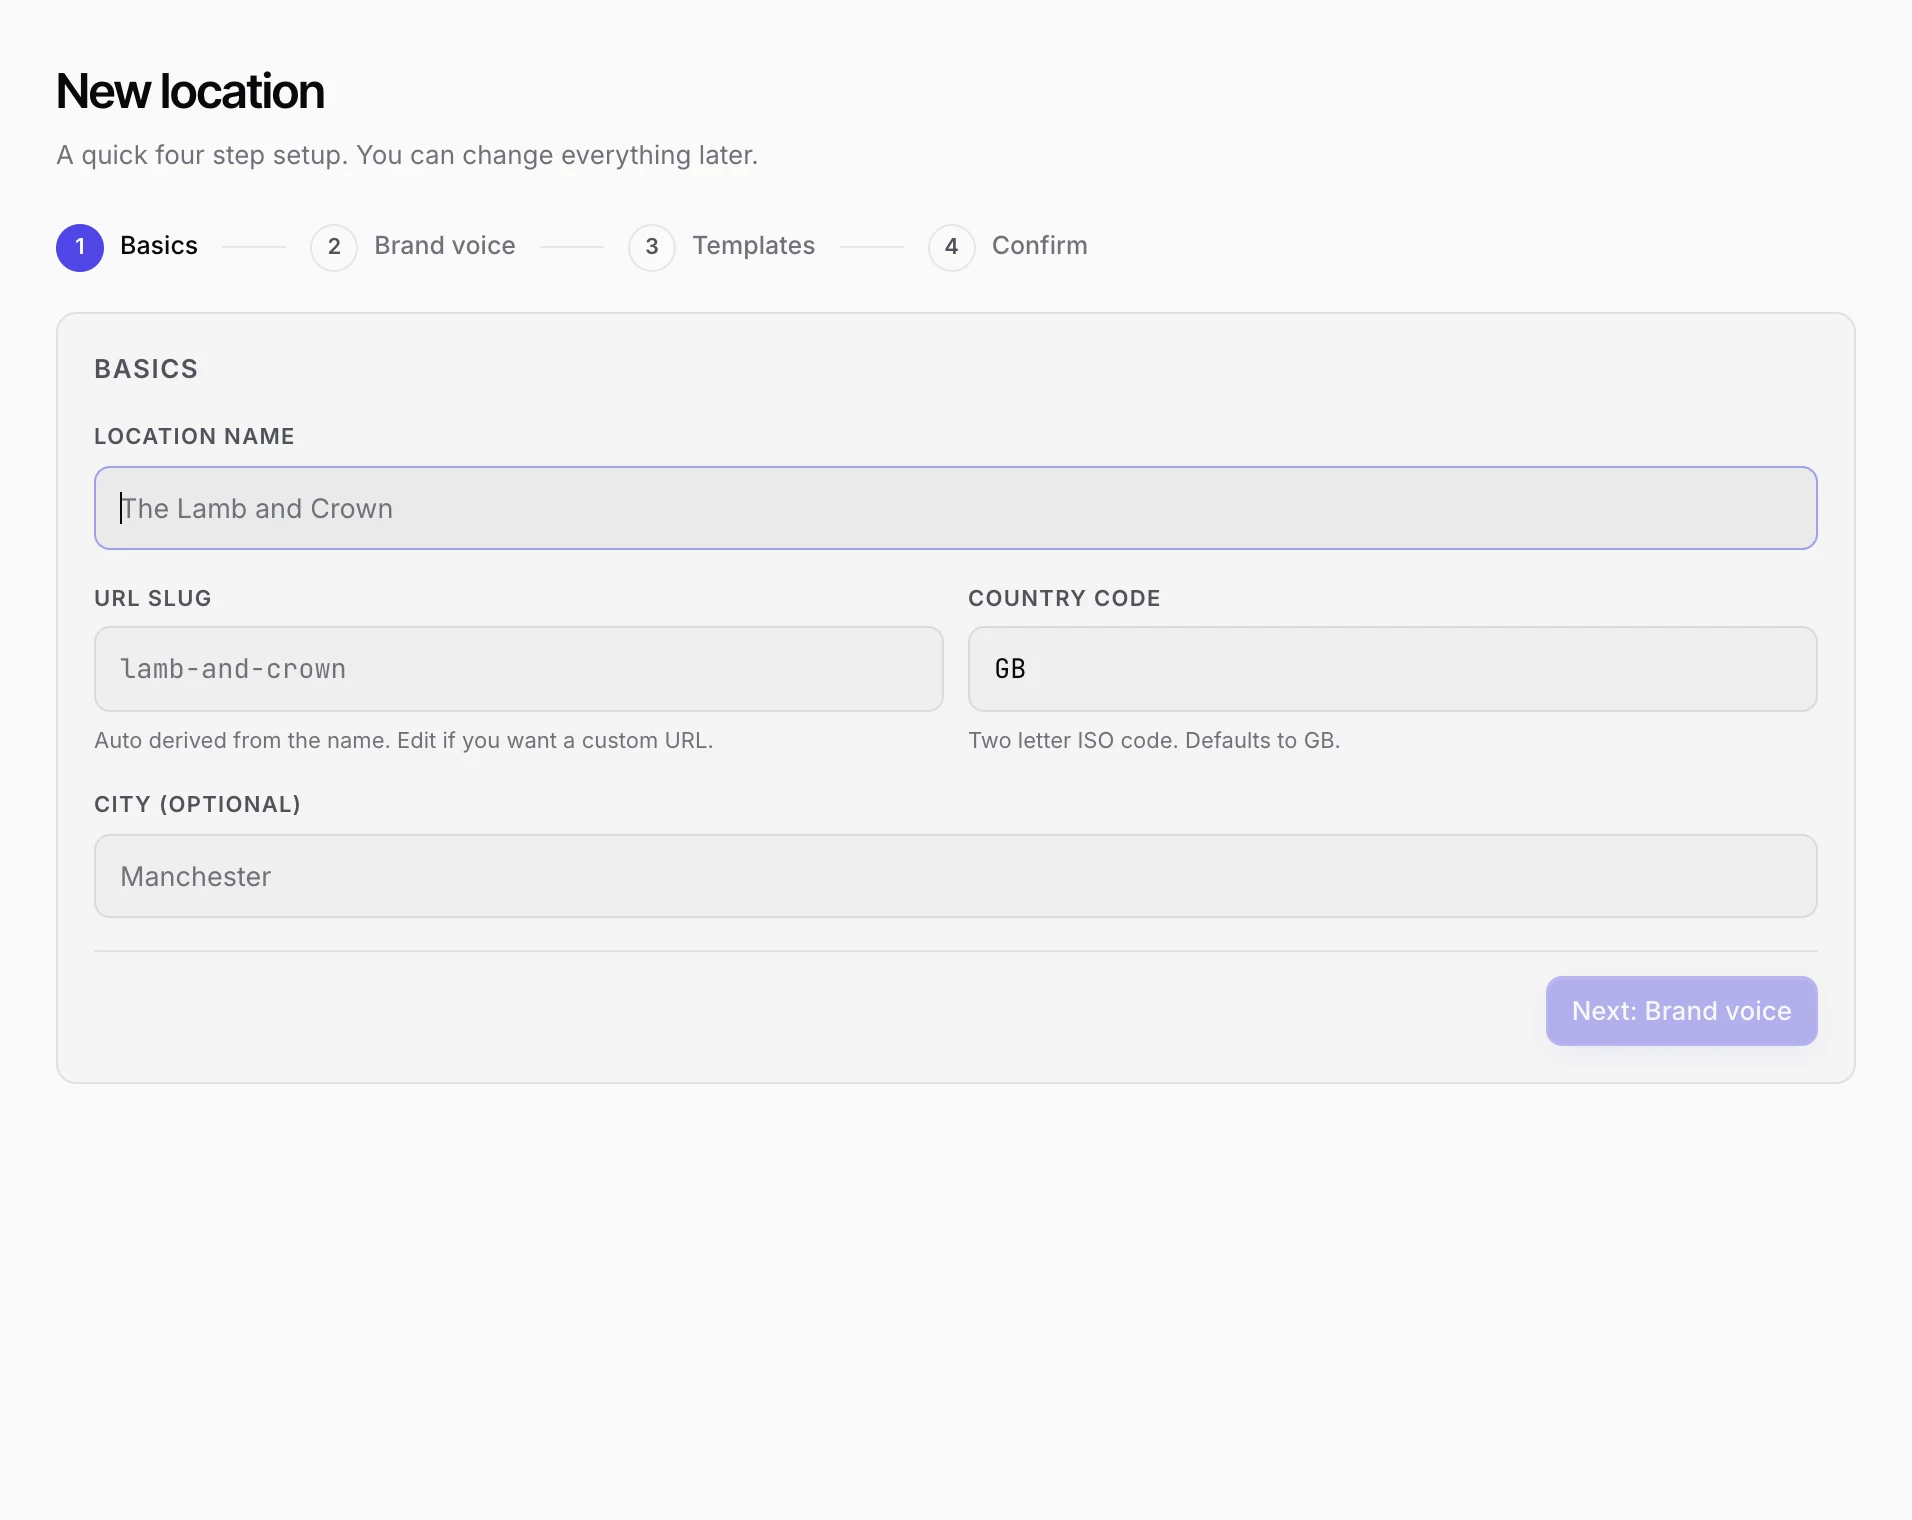
On a plan with more than one location, the switcher at the top of the sidebar changes which venue you're working on. Drafts, the schedule, photos and insights all follow it.
Follow the setup checklist
Until setup is finished, the dashboard shows a checklist for the location you're working on. Each unfinished step has a button that takes you to the right page.
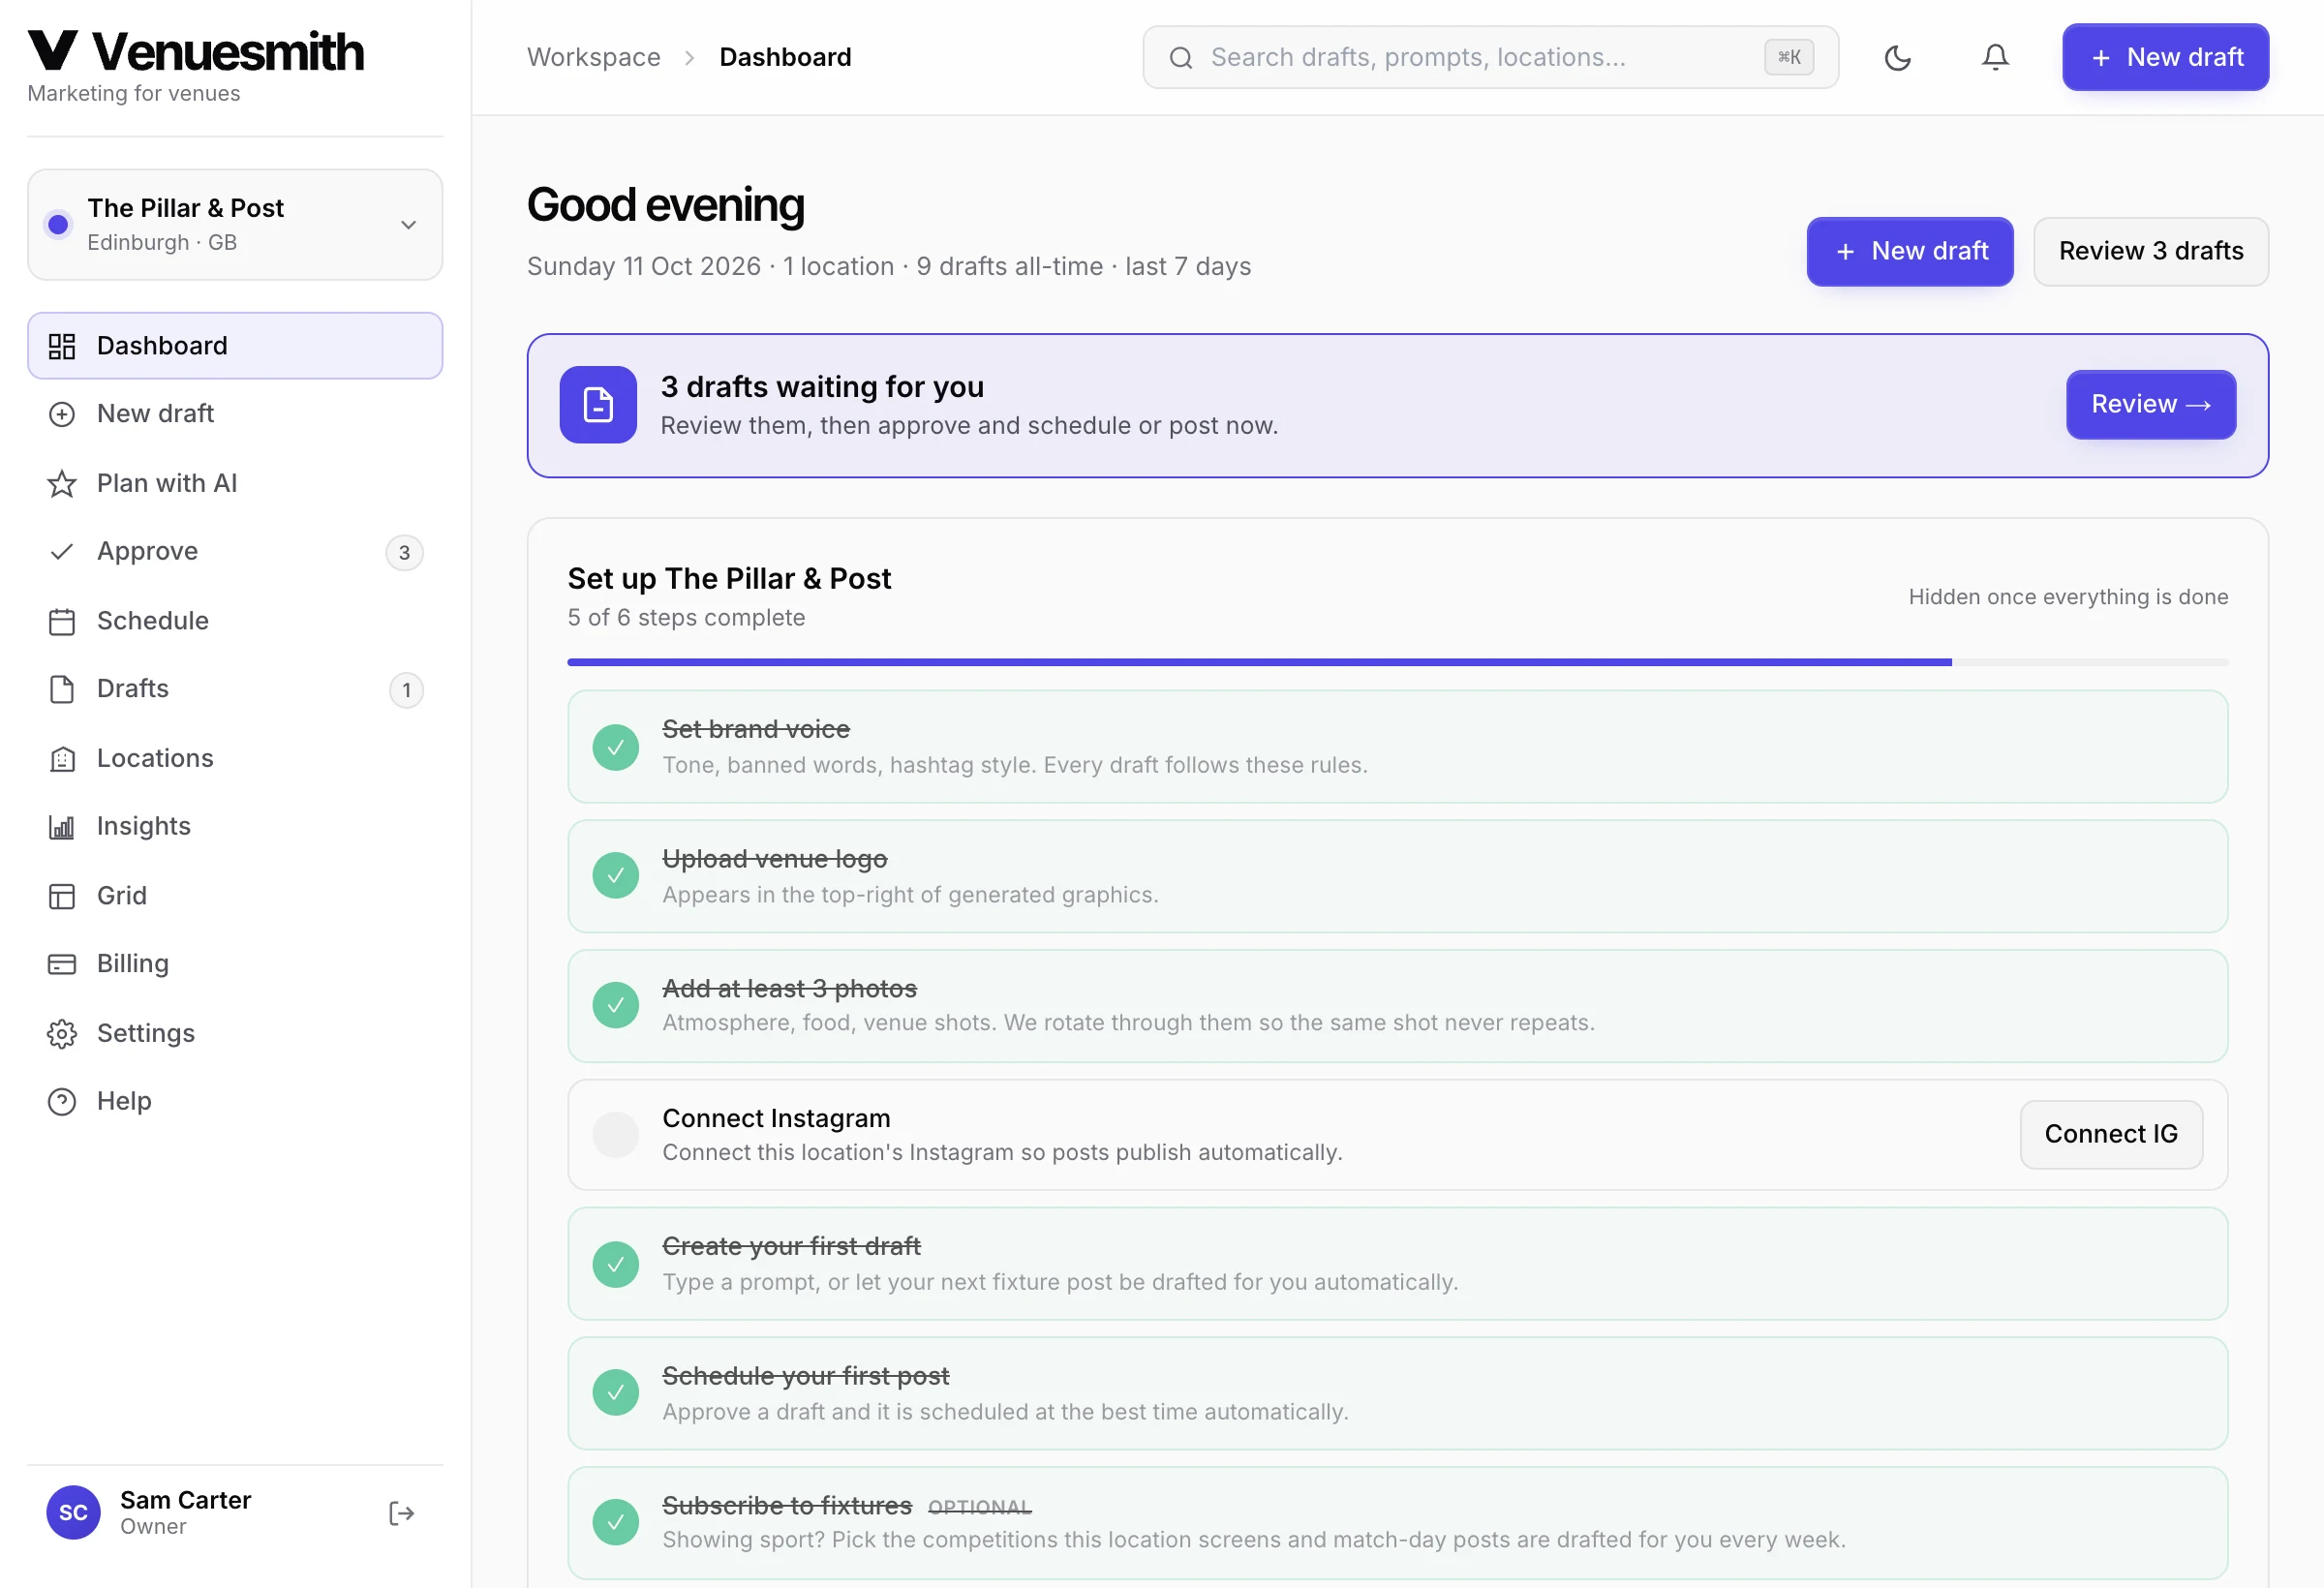
The steps are setting your brand voice, uploading your logo, adding at least 3 photos, connecting Instagram, creating your first draft and scheduling your first post. Subscribing to sports fixtures is there too, marked optional. The checklist disappears once every required step is done.
Set your logo and brand voice
Open Locations, pick your venue and stay on the Brand & logo tab.
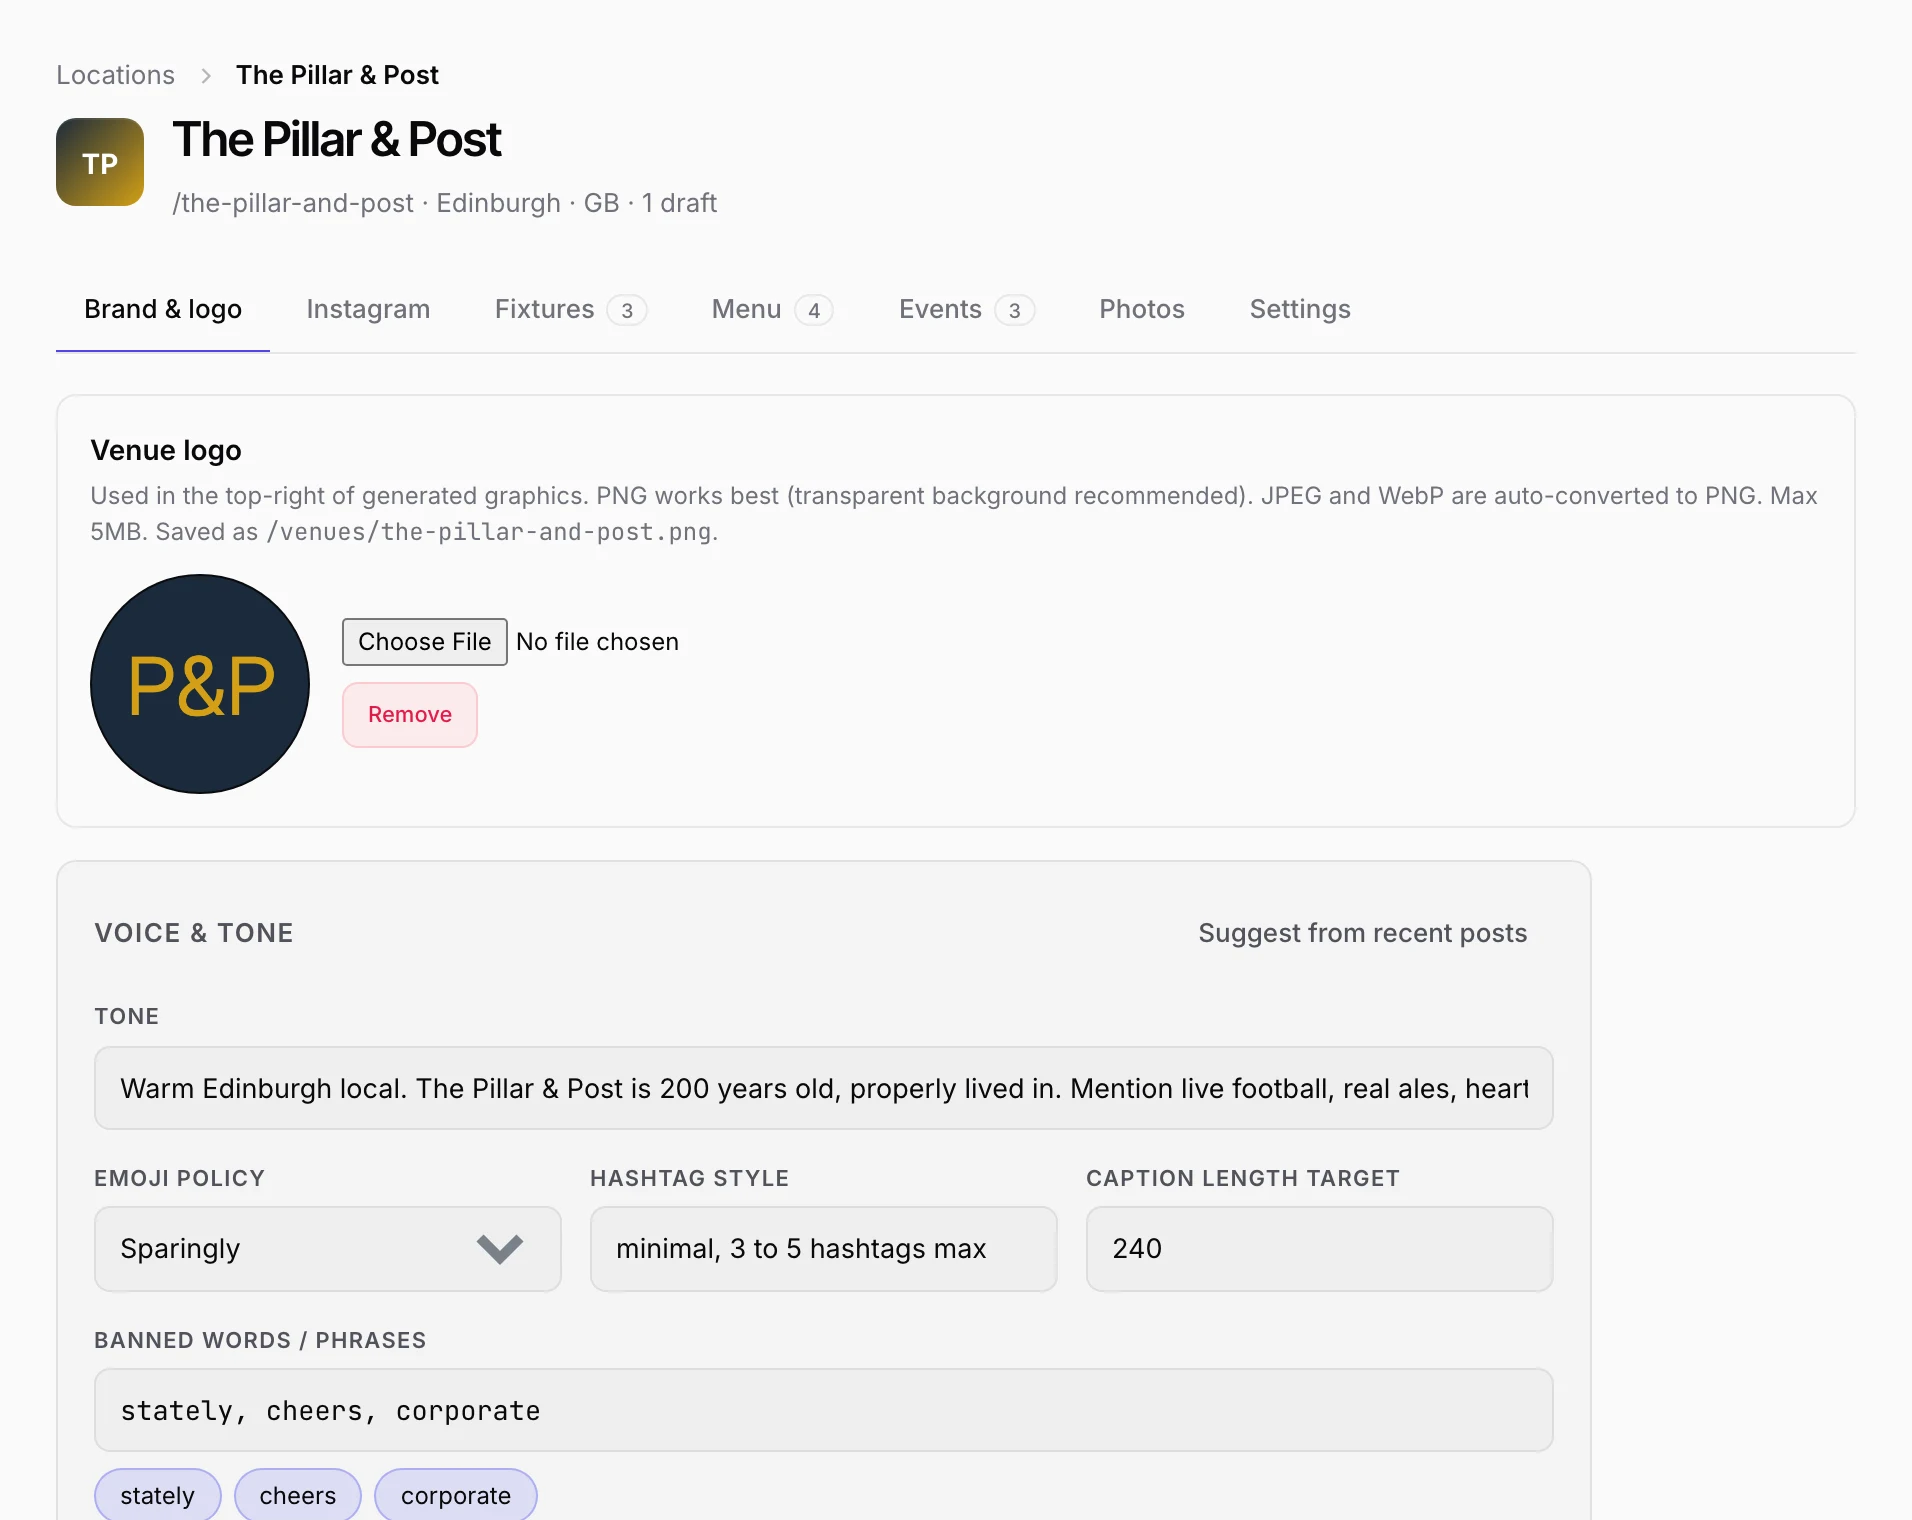
Upload your logo under Venue logo, and it goes on the match-day graphics Venuesmith makes for your fixtures. A PNG with a transparent background works best, and JPEG and WebP are accepted too, up to 5MB.
Under Voice & tone you tell Venuesmith how your venue talks, and every caption is written and checked against these settings:
- Tone: a sentence or two about how you sound, for example "Warm Edinburgh local, direct, never showy".
- Emoji policy and hashtag style.
- Caption length target, in characters.
- Banned words and phrases. A draft that uses one gets rewritten before you see it.
- Brand voice notes, for anything else: facts to mention, a sign-off line, things to avoid.
Click Save brand spec when you're done. If you've already posted a few times, Suggest from recent posts reads your published captions and suggests settings, which you can take or leave one field at a time.
Add photos
The Photos tab on your location holds the pictures Venuesmith uses as post backgrounds.
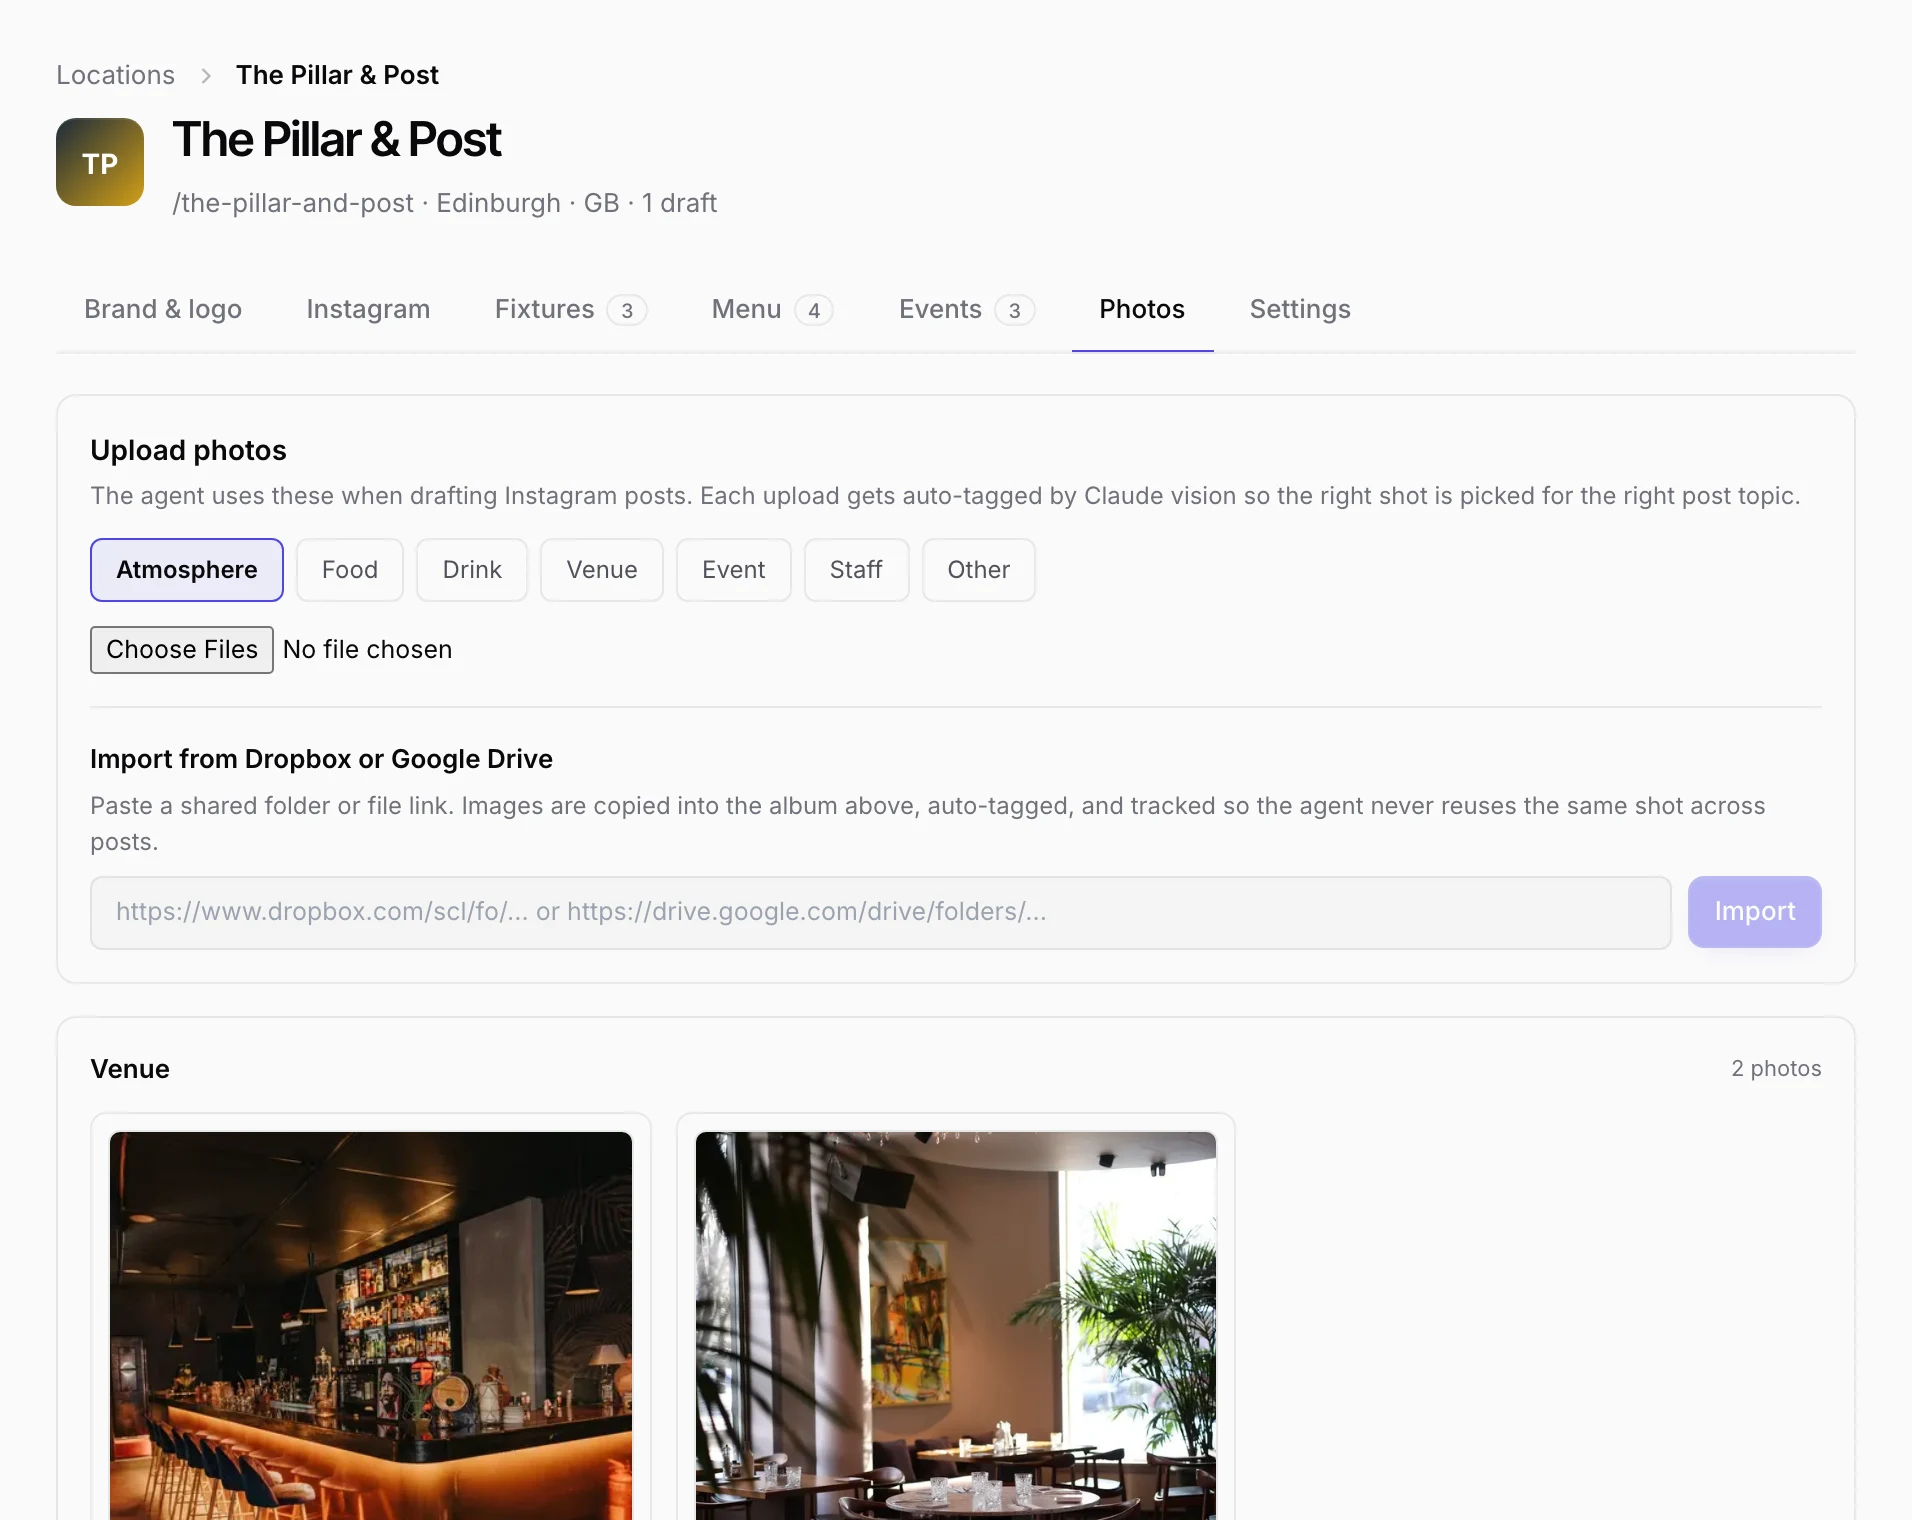
Choose what kind of photo you're adding (atmosphere, food, drink, venue, event, staff or other), then pick the files. JPEG, PNG and WebP are accepted, up to 10MB each and 20 at a time. Each photo is tagged automatically with what's in it, so a post about Sunday lunch gets a food shot and a match-day post gets the bar.
To bring in a whole folder, paste a shared Dropbox or Google Drive link into Import from Dropbox or Google Drive (up to 50 images per import). The step-by-step guides for Dropbox and Google Drive cover the sharing settings.
Venuesmith picks the least-used photo that fits each post, so the more photos you add, the less often any one of them repeats. You can add or remove tags on a photo to steer it towards the right posts, re-run the automatic tagging, or delete it.
Connect Instagram
Venuesmith publishes through Instagram's official API, which needs two things on your side:
- An Instagram Business or Creator account (personal accounts can't be posted to by apps).
- That Instagram account linked to a Facebook Page you manage.
If the venue has no Facebook Page yet, or its Instagram isn't linked to one, Connecting Instagram walks through creating the Page and linking the account first.
Then open your location's Instagram tab and click Connect Instagram.
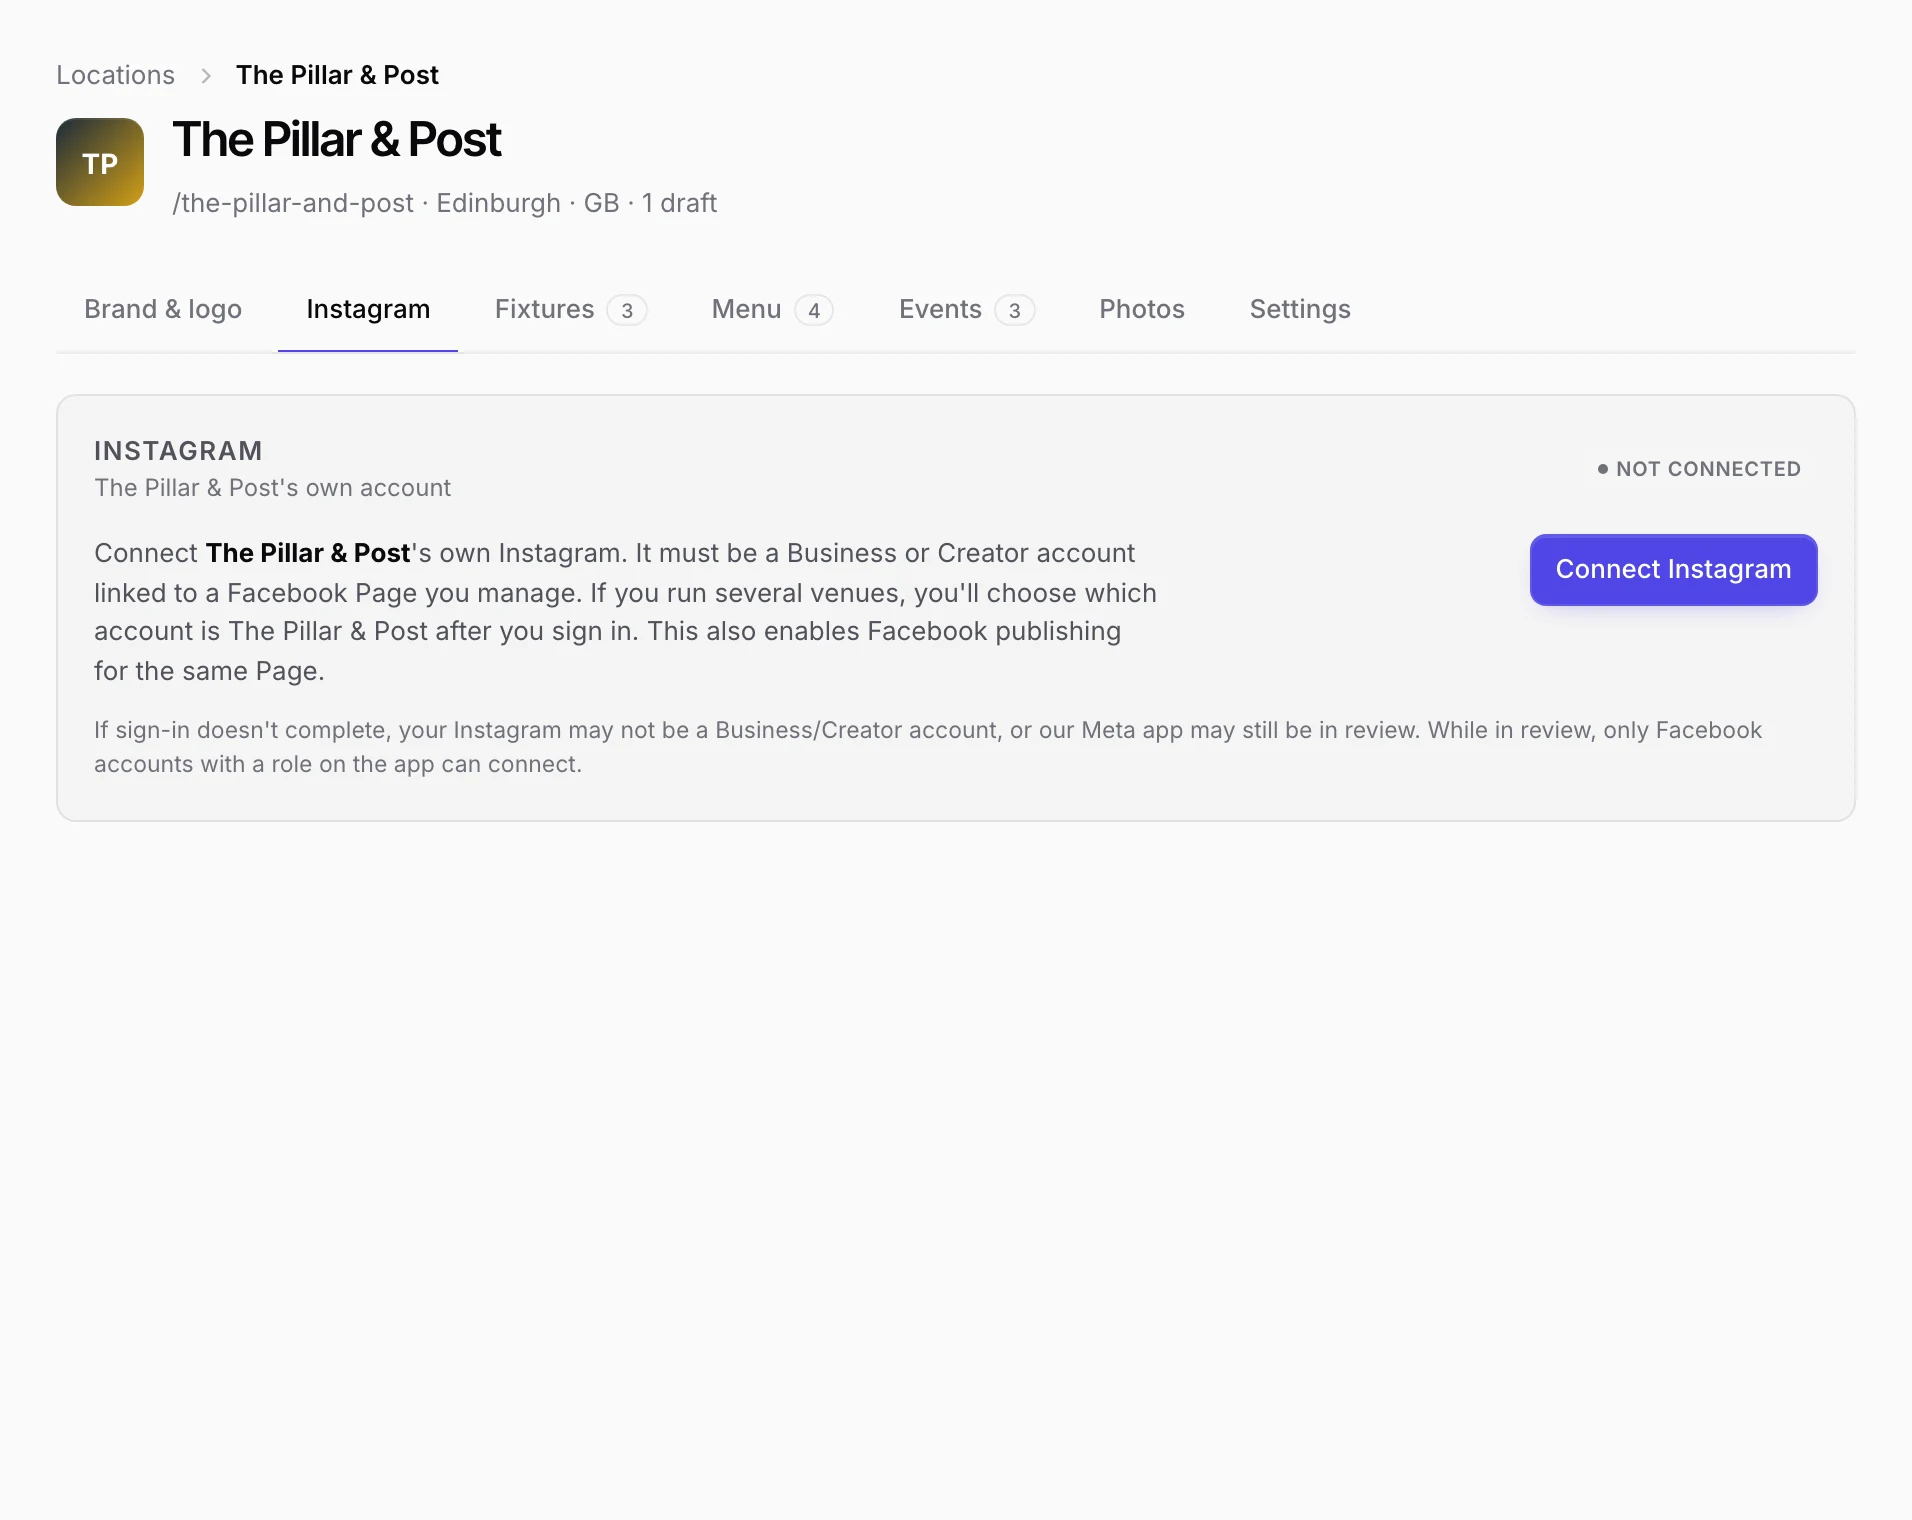
Sign in with the Facebook account that manages the Page. The first time, click Edit settings when Facebook offers to continue with your previous settings, then choose the Opt in to all current and future option on the Pages, Businesses and Instagram accounts screens: sharing only some Pages can cut off locations you've already connected. If you manage more than one Instagram account, Venuesmith then asks which one belongs to this venue: click Use for this venue next to the right one. Once connected, the tab shows Connected with the account's ID number, plus an expiry date when Meta gives one.
Instagram access can lapse (after a password change, for example). When it does, the dashboard shows a banner with a Reconnect button, and posts wait until you reconnect. Only workspace owners and admins can connect or disconnect an account.
Create a post
Click New draft in the sidebar, or the button at the top right of any page.
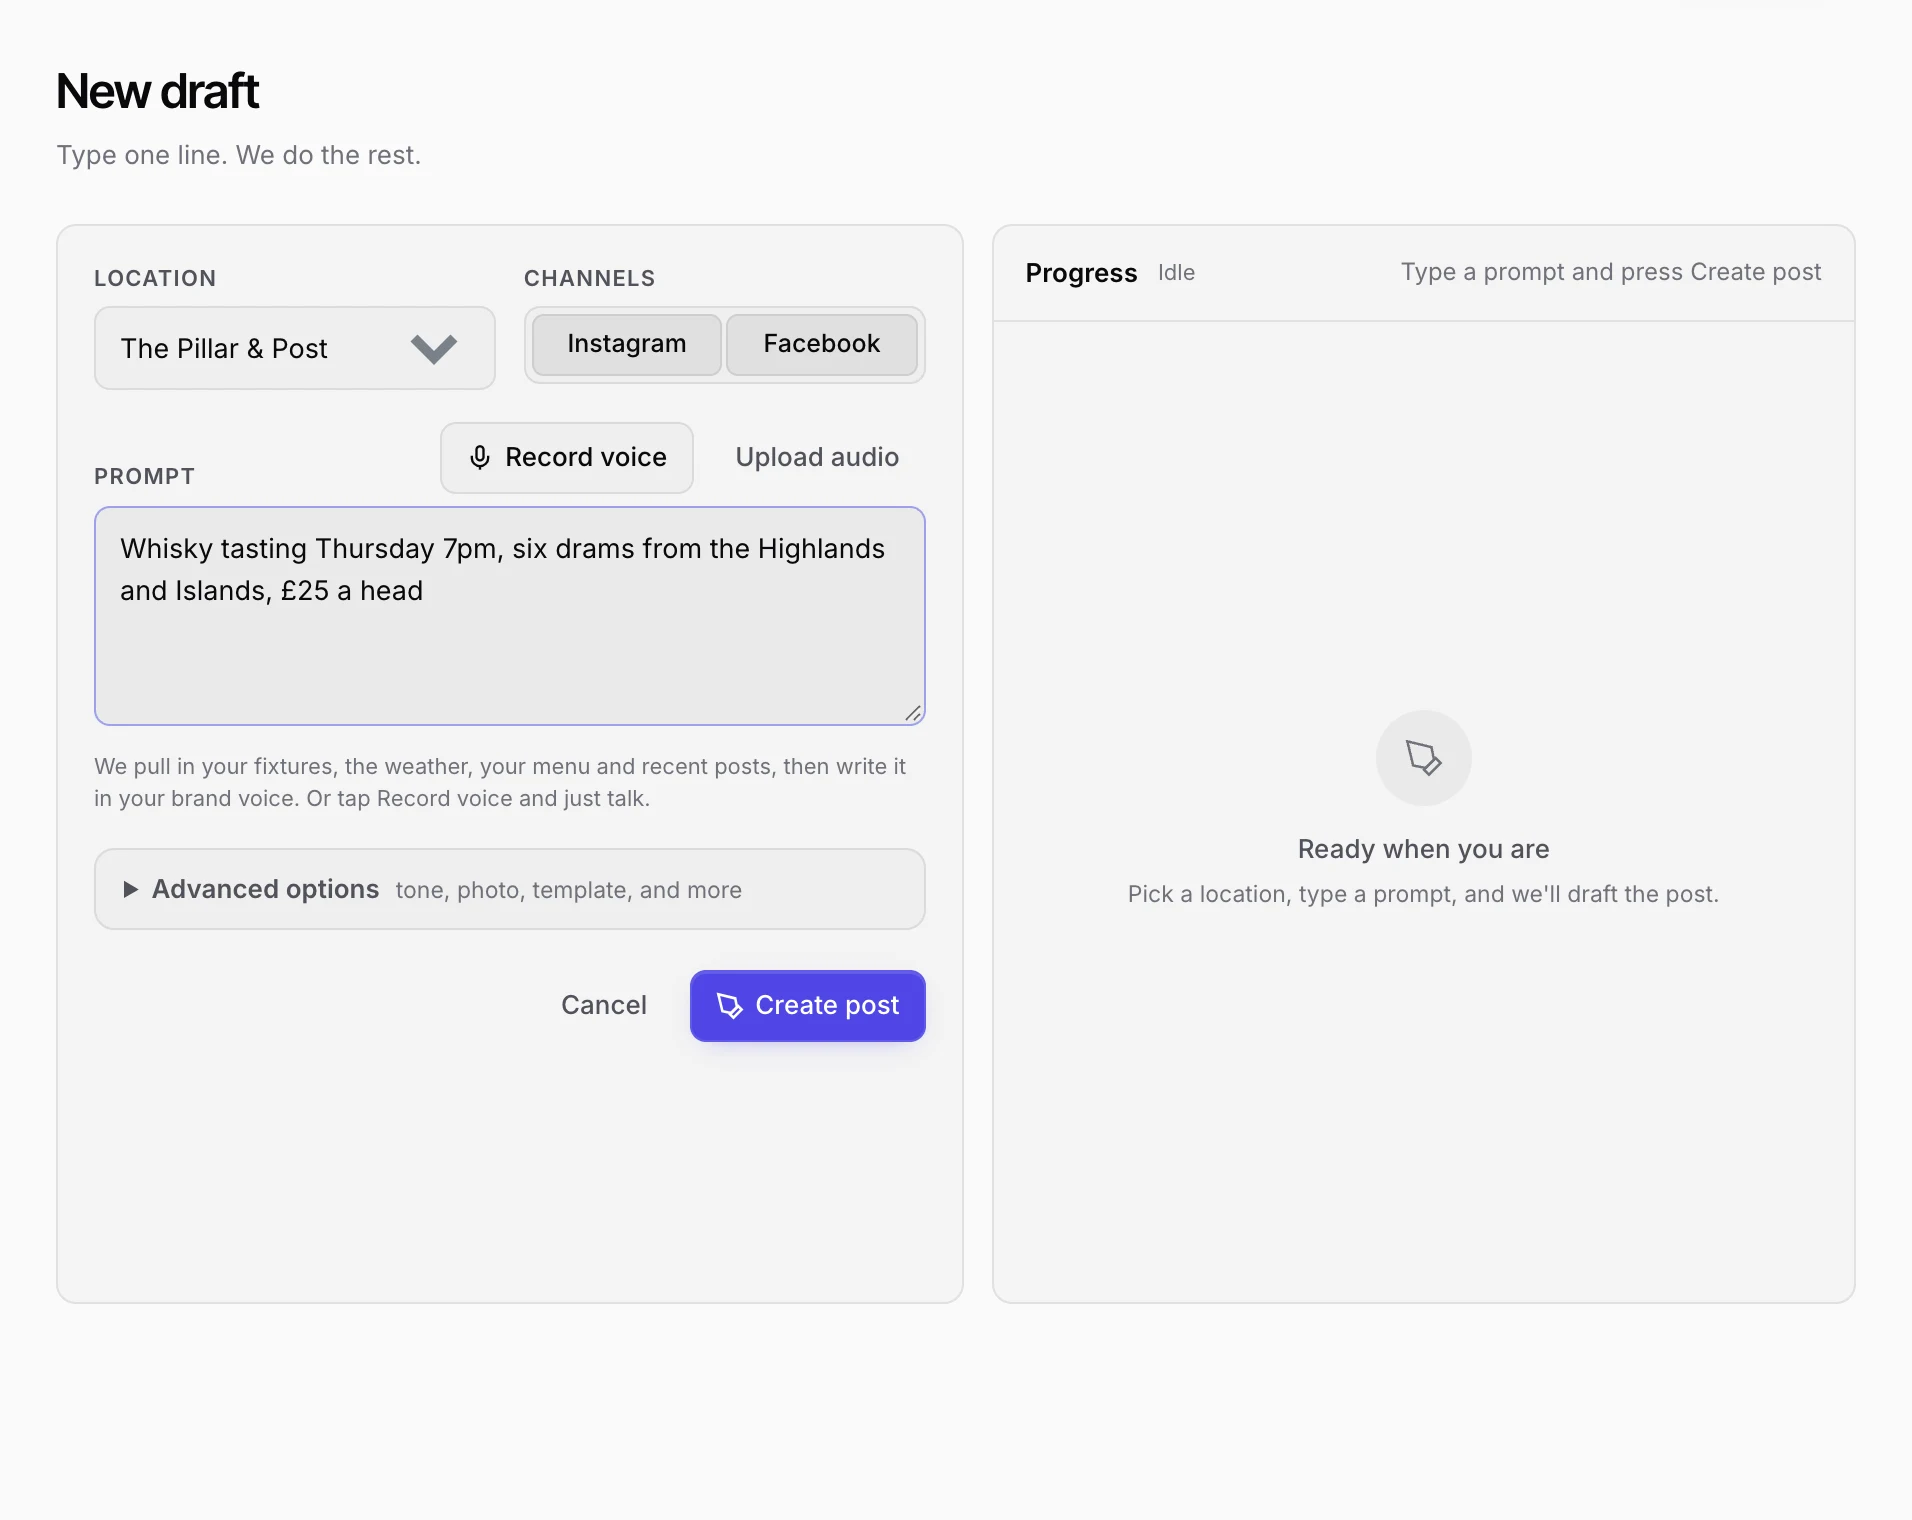
Pick the location and describe the post in one line. Put in the details you want in it, such as the day, the time and the price:
Whisky tasting Thursday 7pm, six drams from the Highlands and Islands, £25 a headTo talk instead of typing, click Record voice and say it.
Click Create post. Venuesmith writes the caption in your brand voice, picks a photo and template, renders the image and adds hashtags and alt text, with progress shown on the right. When it finishes, click Open in editor to look it over.
Advanced options holds the extras: a tone for this one post (Hype, Standard, Classy or Casual), a call to action, a sponsored-content label, a specific template, and a photo of your own to use or to write about.
Review and approve
New drafts wait for you on the Approve page. The number next to Approve in the sidebar is how many are waiting.
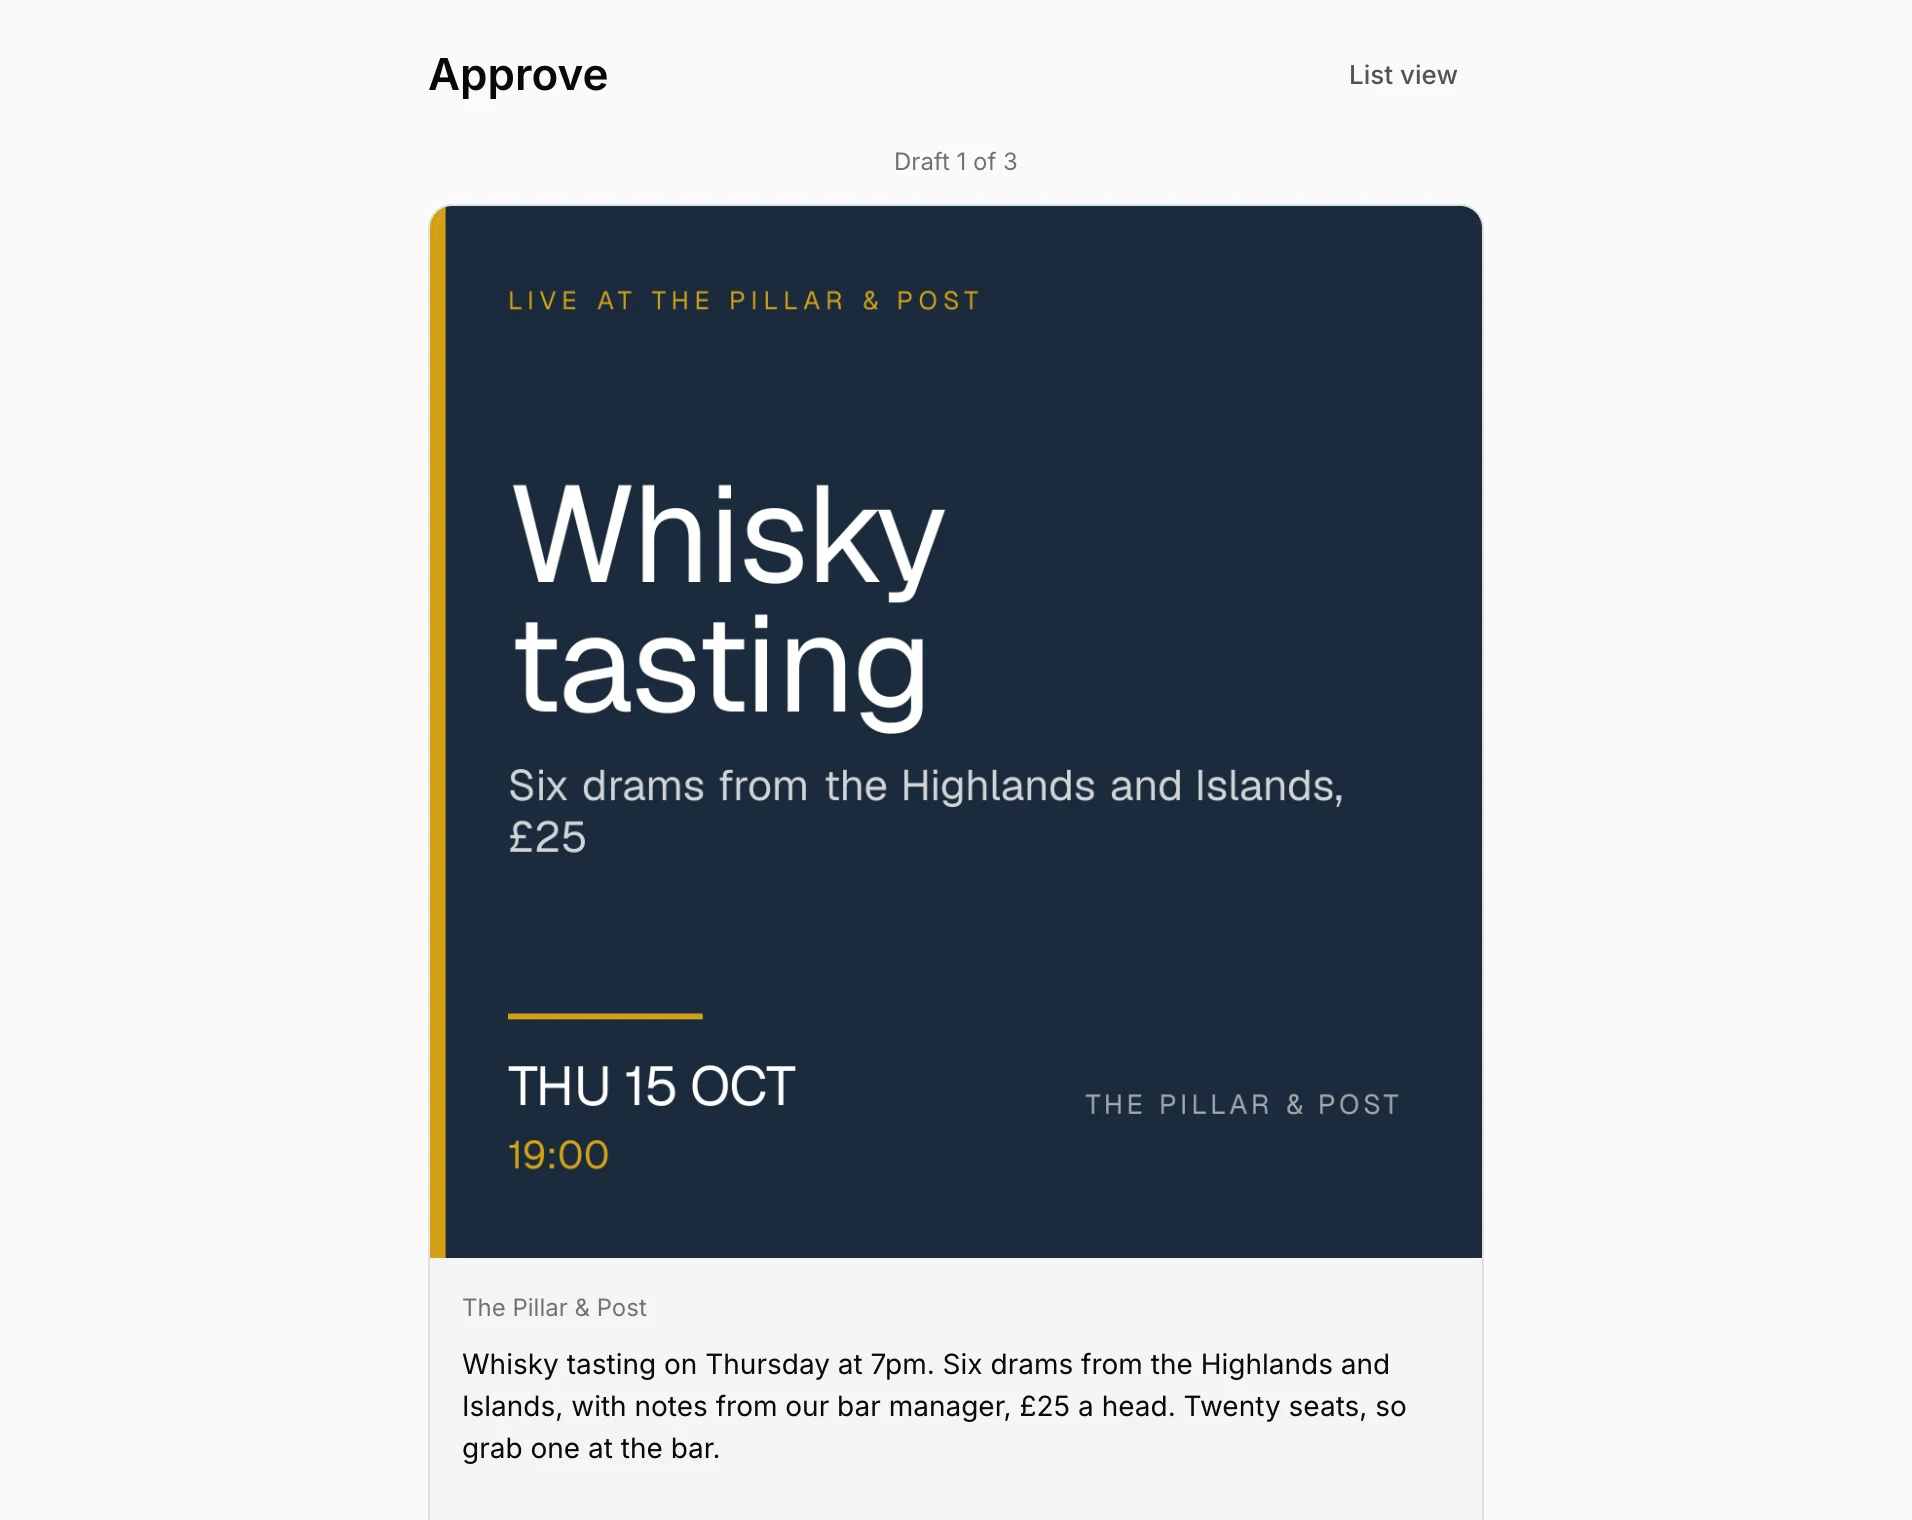
You see one draft at a time, with its image and caption. Click Approve (or swipe right on a phone) to accept it, or Reject (swipe left) to send it back, with an optional note saying why. The arrow keys work too.
Approving schedules the post for you. Match-day posts go out two hours before kickoff, and everything else goes in the next good posting slot for your venue. If the draft already has a time, that time is kept. The time chosen appears with an Undo button for 10 seconds in case you change your mind.
Nothing goes out until someone approves it or clicks Post now, and both need the owner or admin role (see Invite your team).
Edit a draft
Click any draft (on the dashboard, the Drafts page or the Schedule) to open the editor.
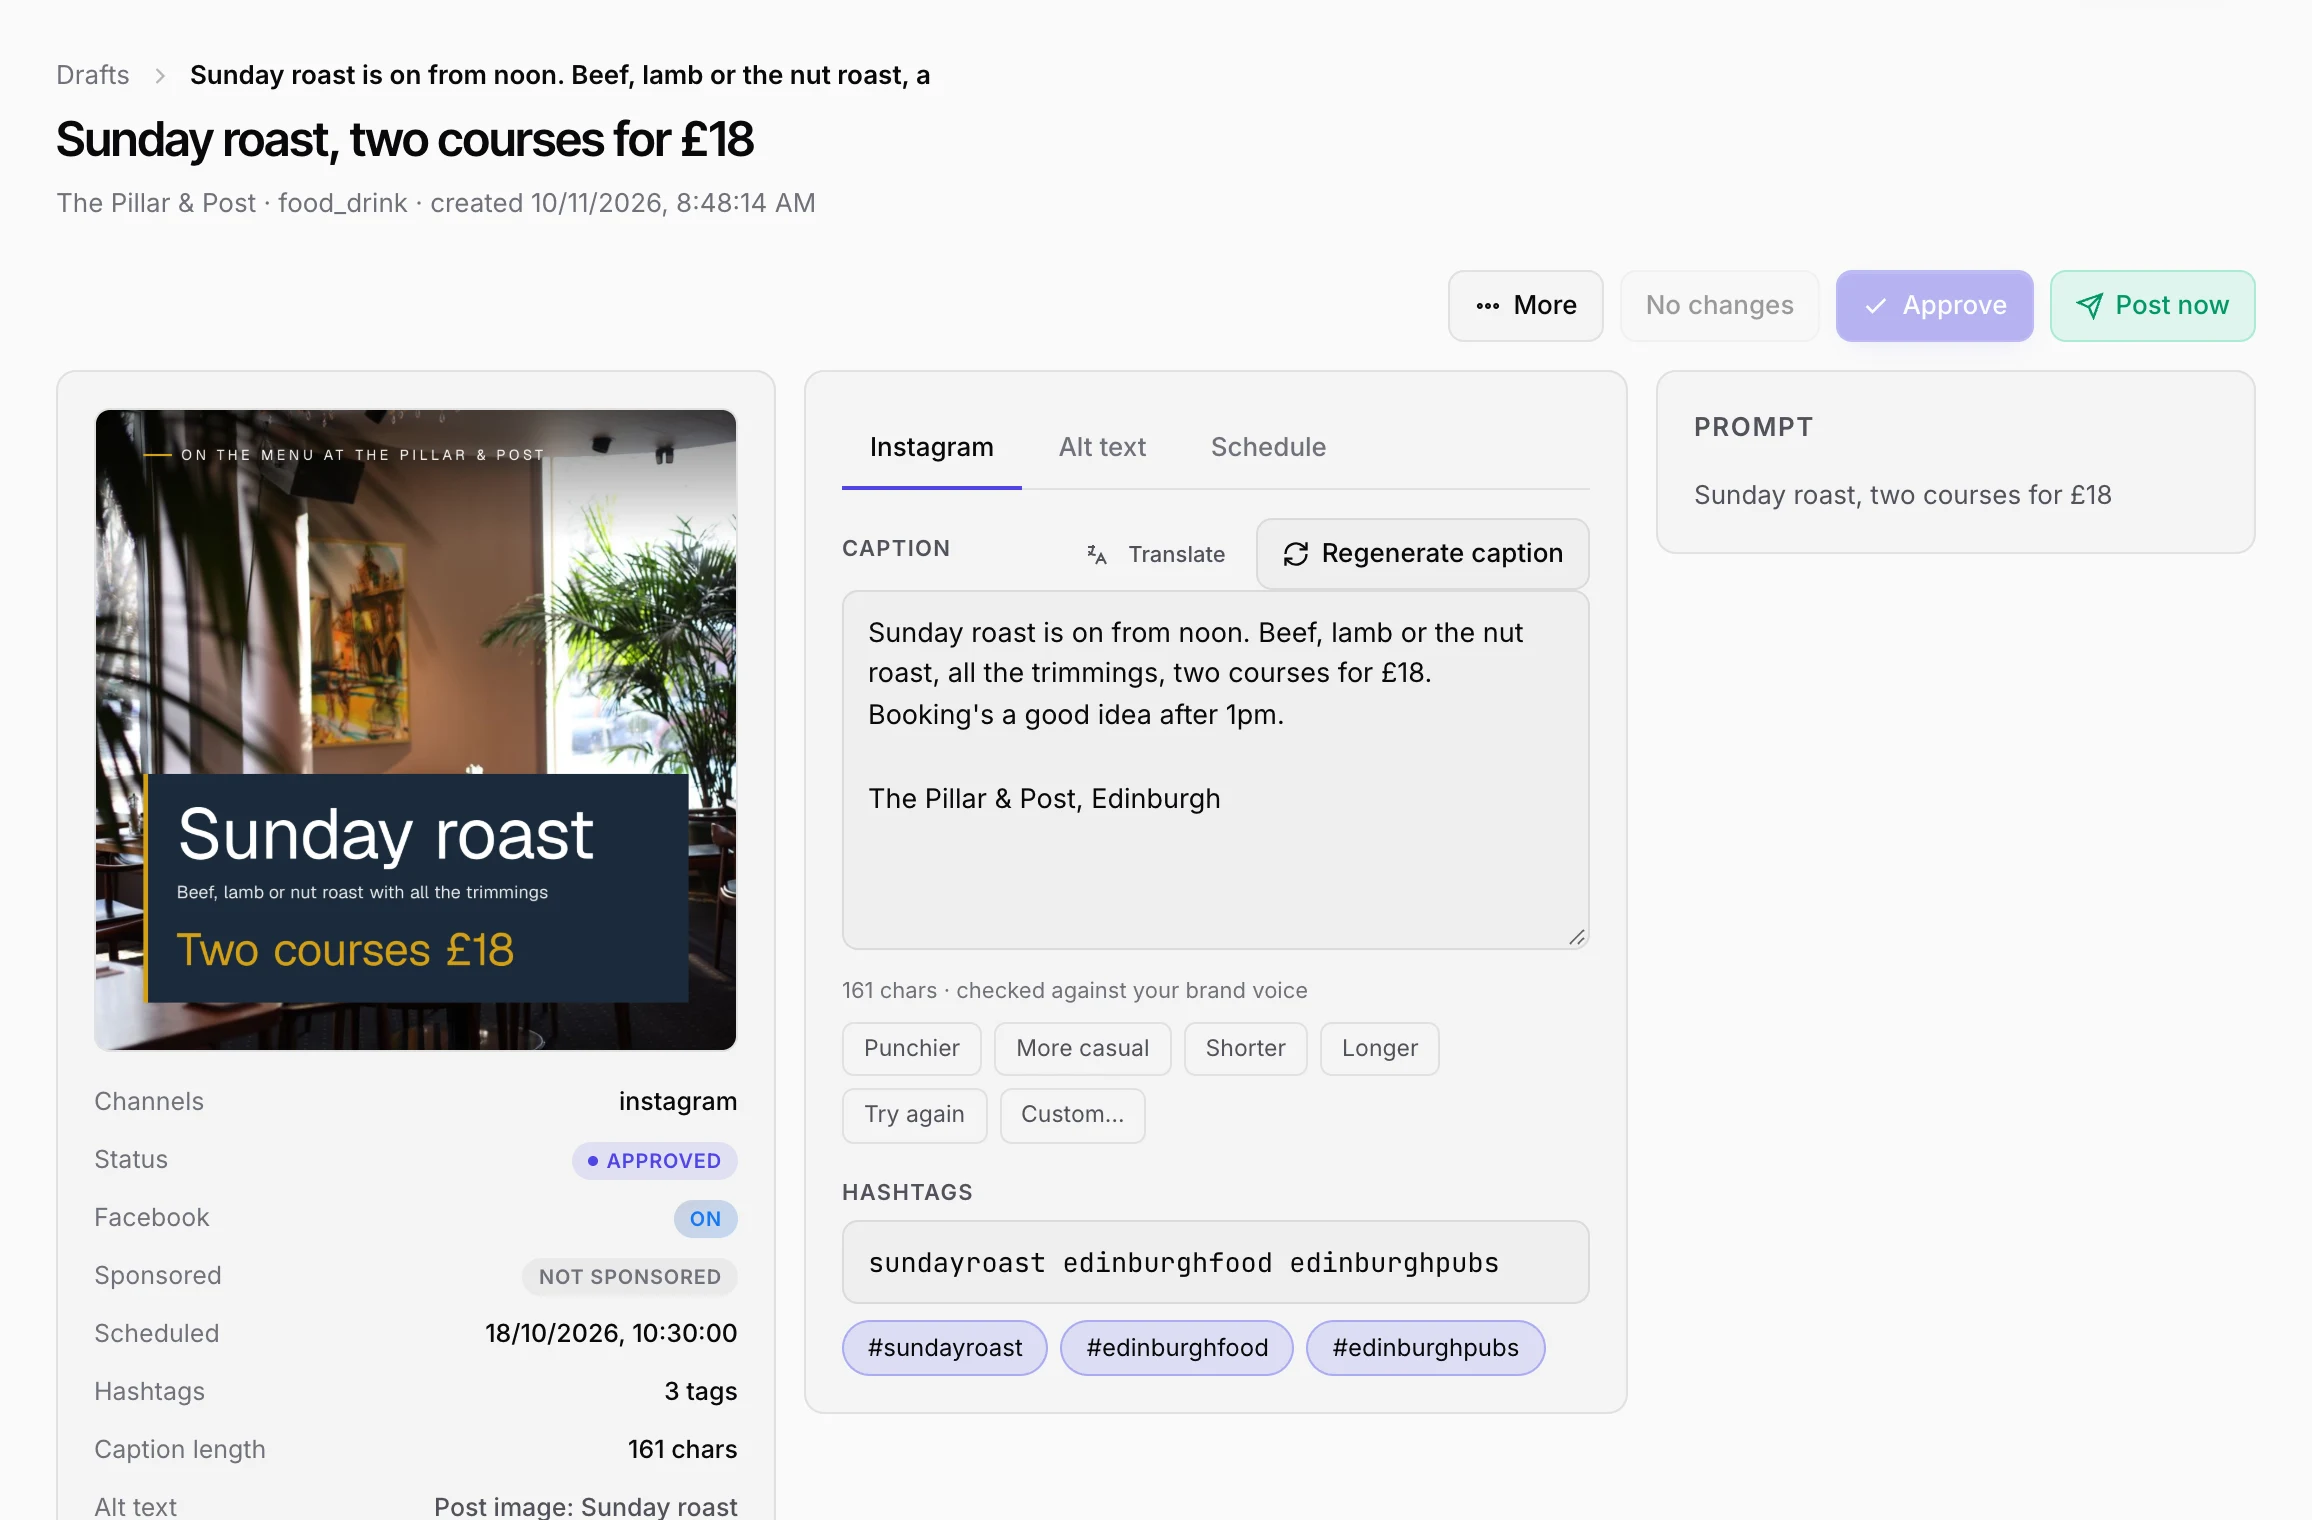
The image preview sits on the left, with the post's details under it. In the middle:
- The Instagram tab has the caption and hashtags. Edit the text directly, click Regenerate caption for a fresh version, or use the quick rewrites (Punchier, More casual, Shorter, Longer, Try again, or Custom to say what to change). Translate rewrites it in another language.
- The Alt text tab is the image description that screen readers read out.
- The Schedule tab sets when the post goes out.
Click Save edits after changing anything, then Approve, or Post now to publish straight away.
The More menu has the rest: Download image, Re-render image (after you've changed the details), Create A/B variant (see A/B testing), Clone draft, Dismiss and Delete. For a post that failed, it also has Retry publish.
To post by hand instead, open Manual upload pack under the preview. It lets you save the image and copy the caption with its hashtags, ready to paste into Instagram.
Schedule posts
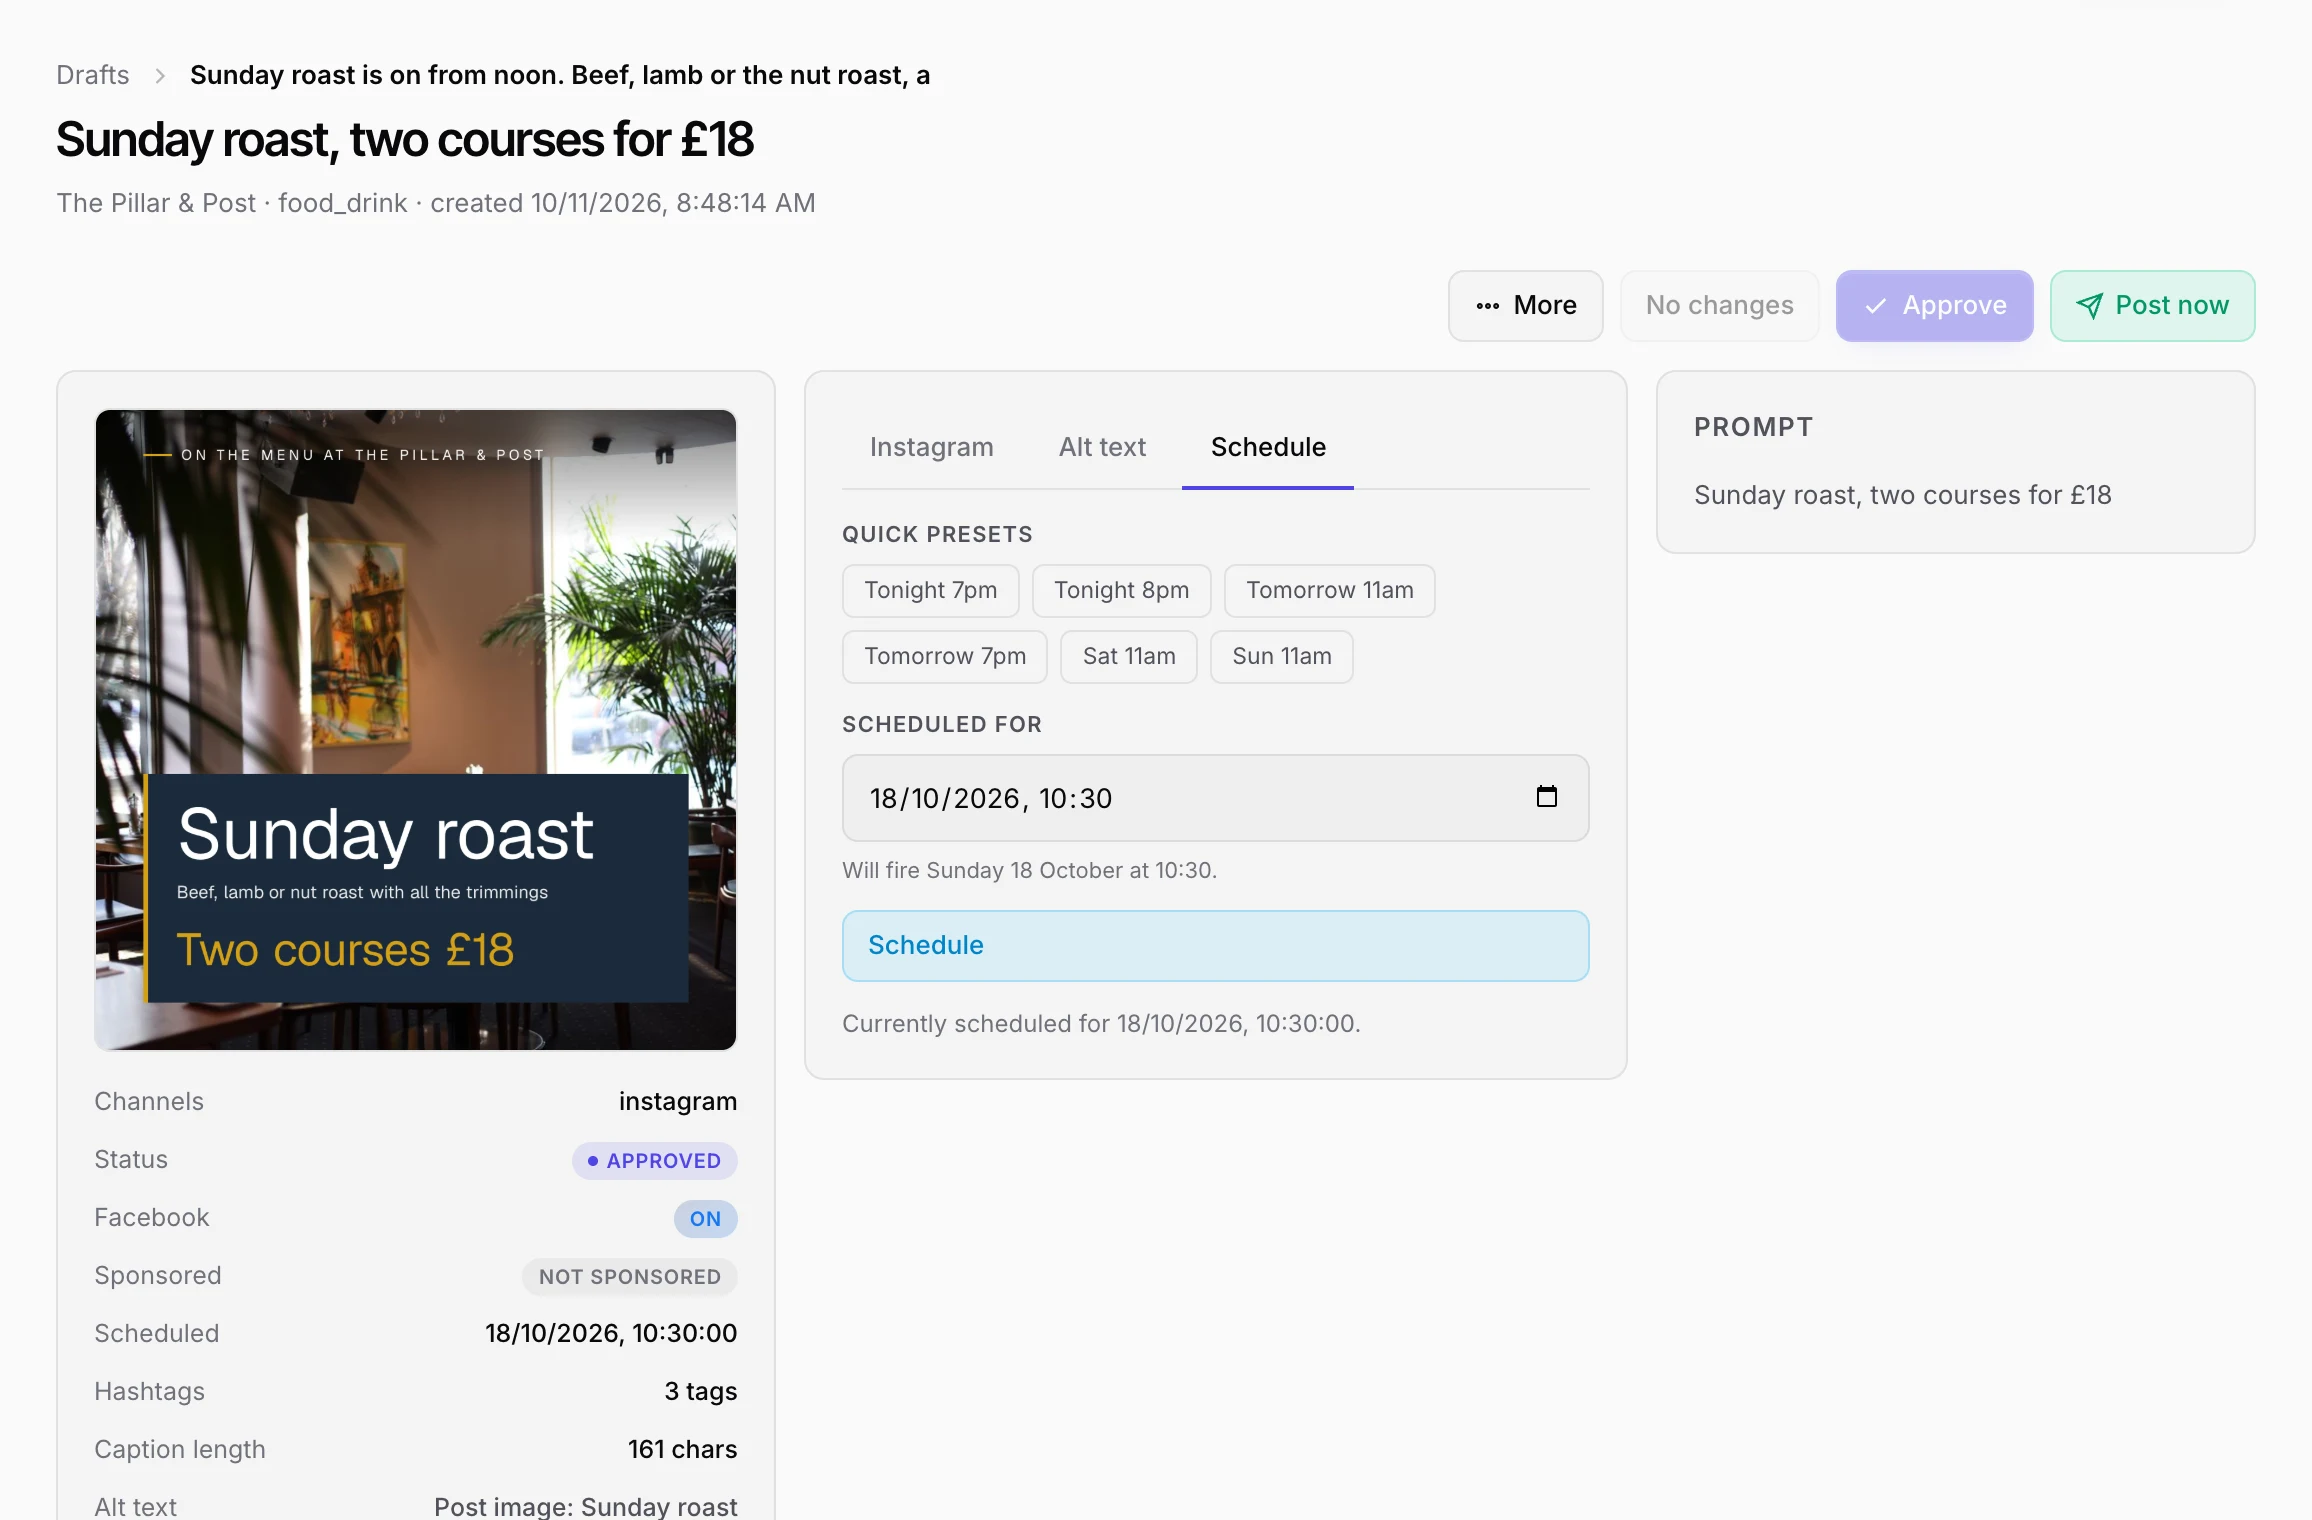
To pick a time yourself, open the draft's Schedule tab. Use a quick preset such as Tonight 7pm or Tomorrow 11am, or choose a date and time, then click Schedule.
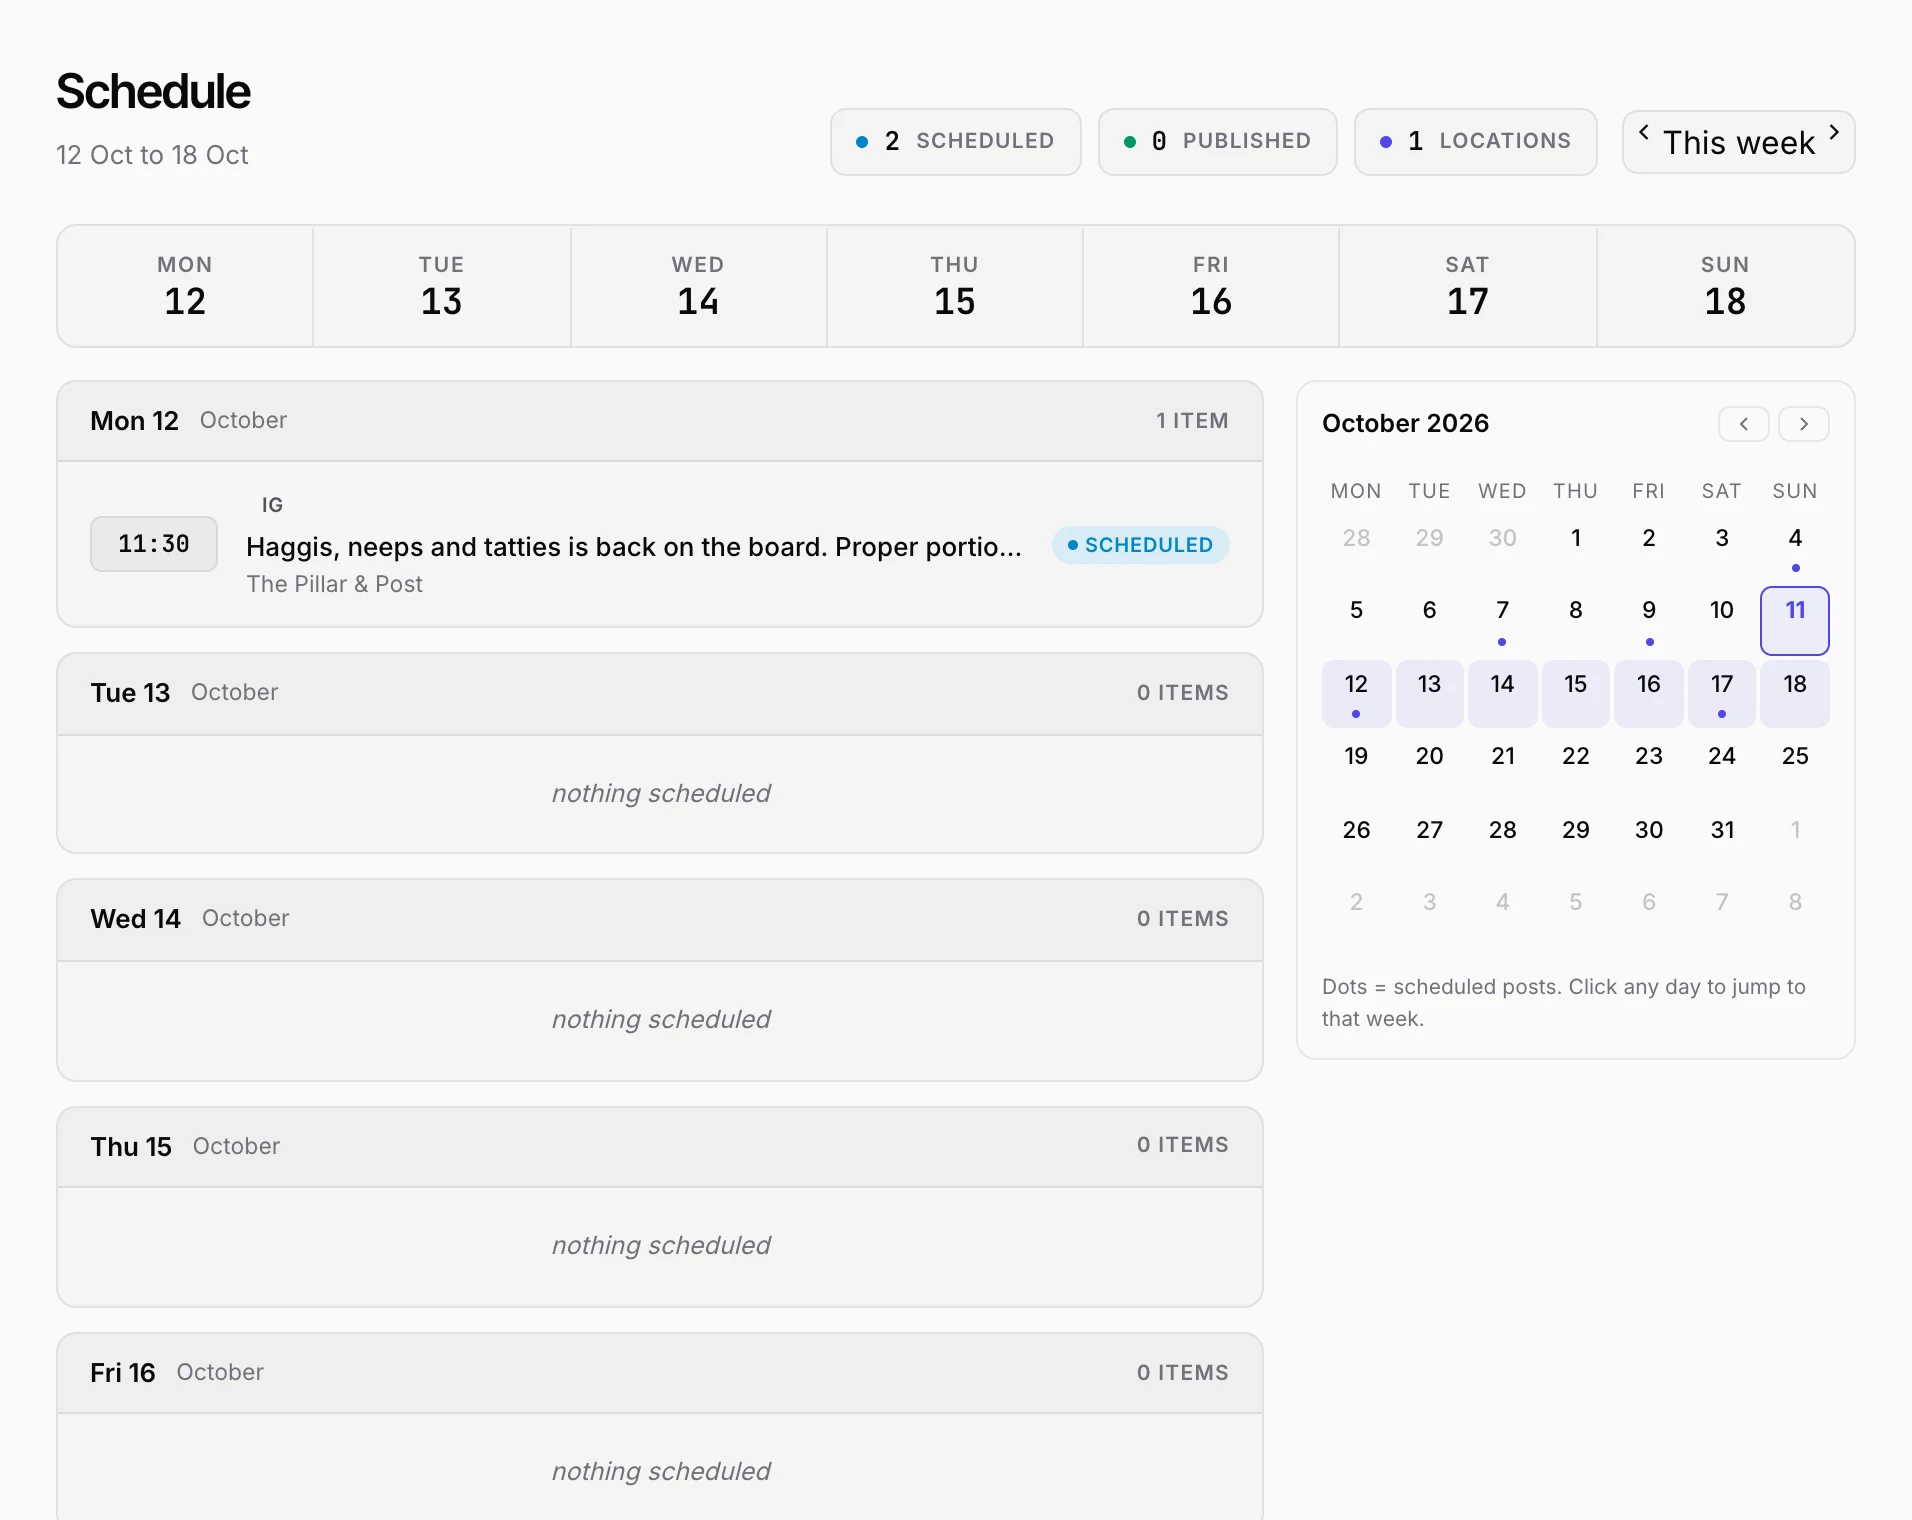
The Schedule page in the sidebar shows what's going out, a week at a time. Use the arrows either side of This week to move between weeks, or the month calendar beside it. Click any post to open it.
Scheduled posts publish on their own at the set time. If one fails (usually because Instagram access lapsed), it's marked Failed with the reason on the draft; reconnect Instagram if needed, then click Try again on the draft.
Find and manage drafts
The Drafts page lists every post for your locations, newest first.
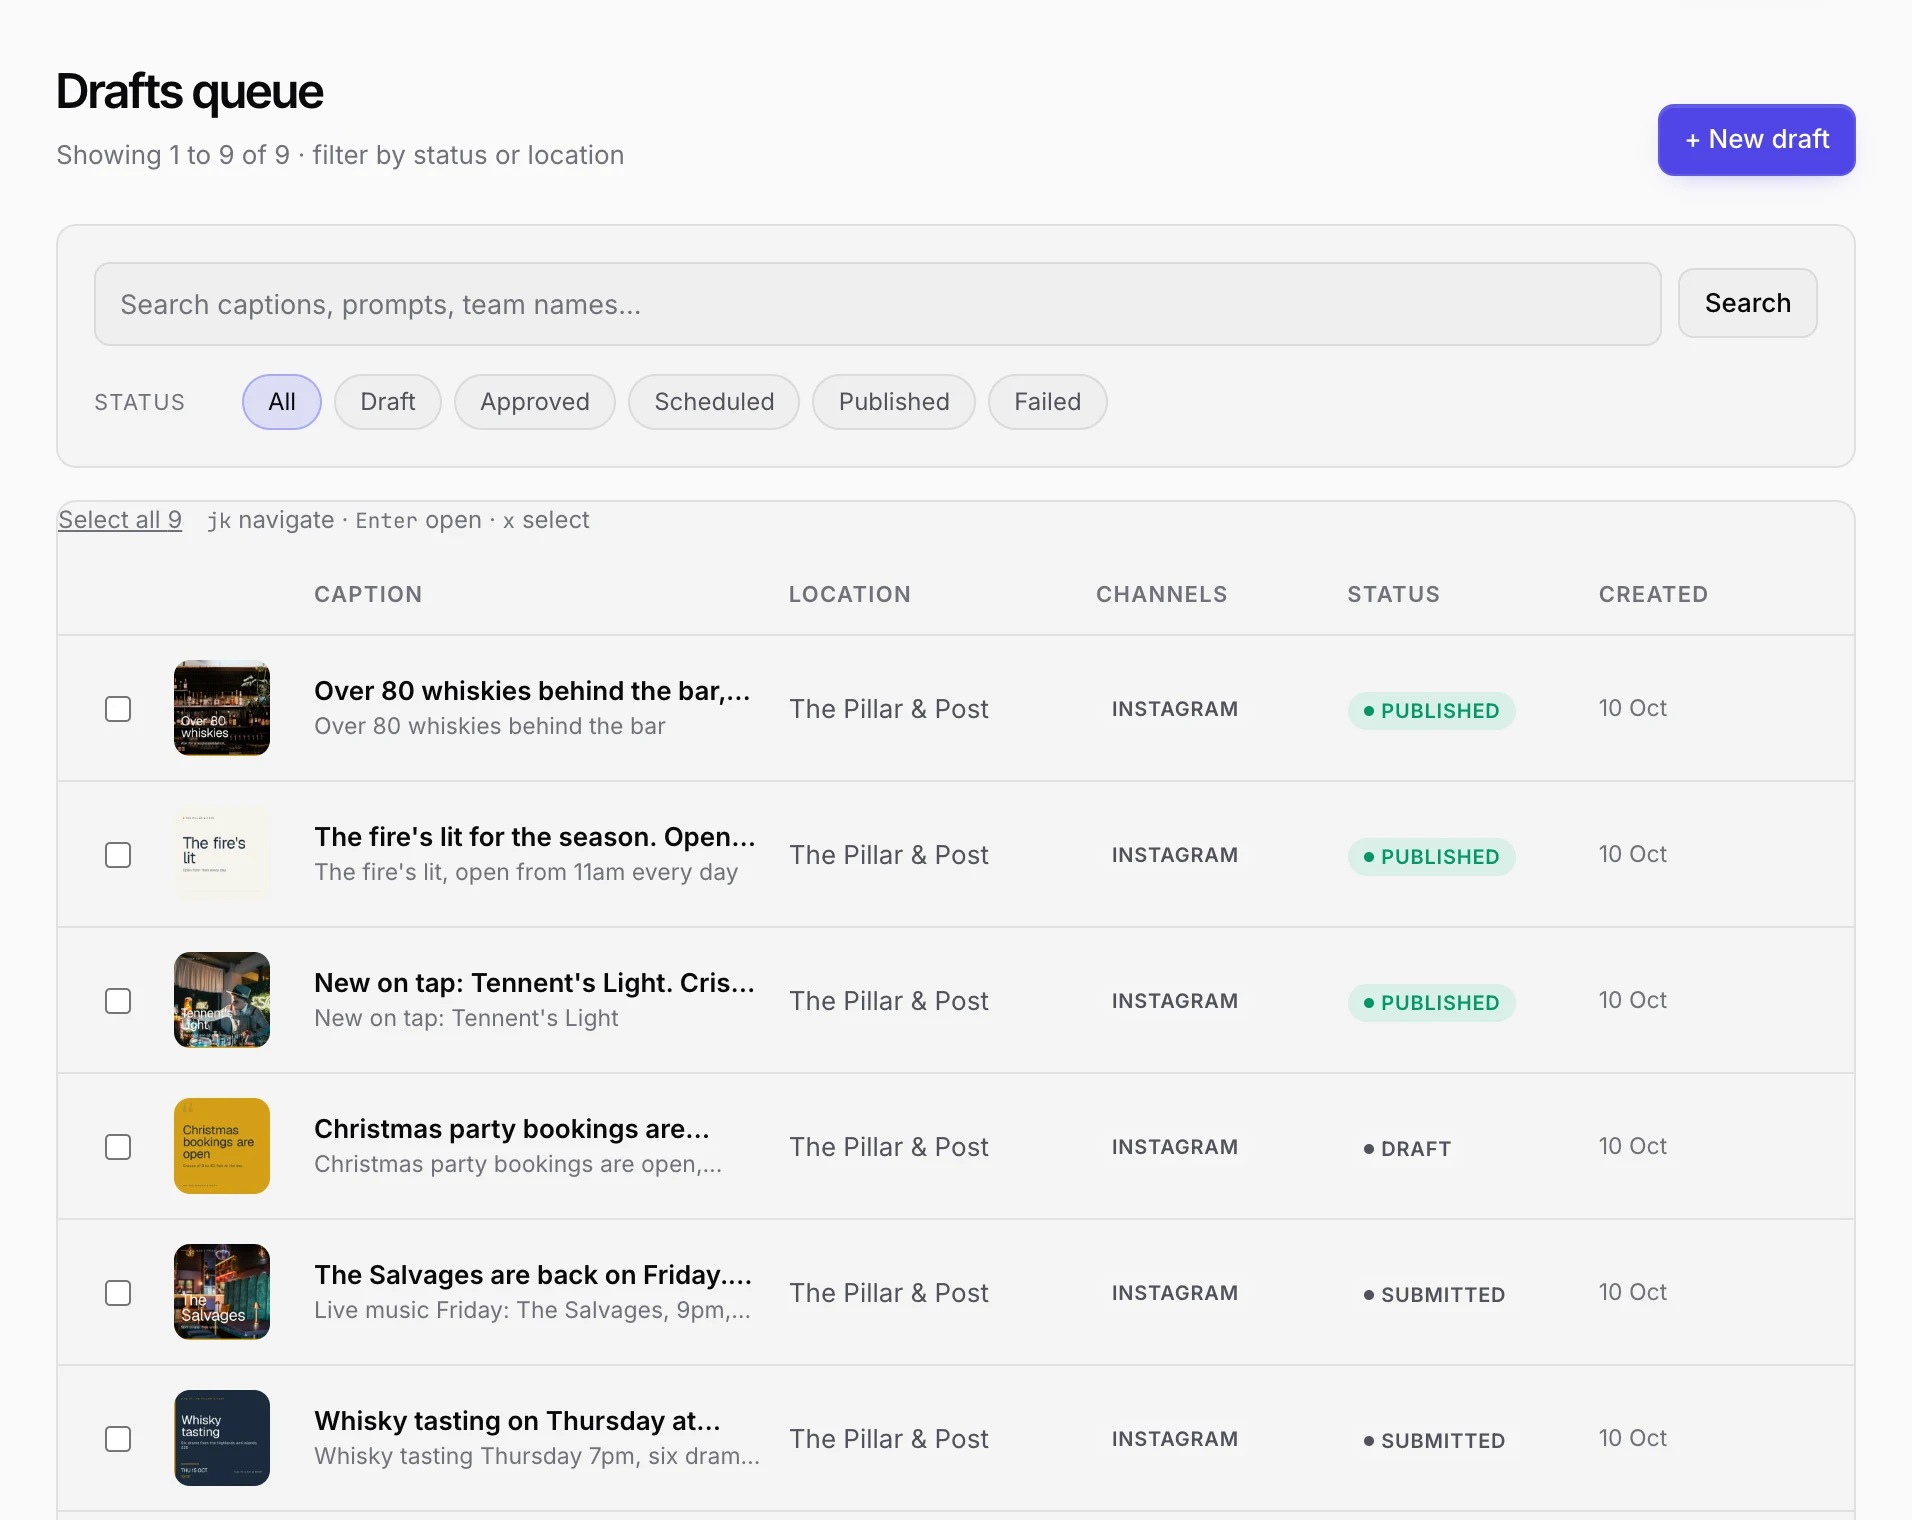
Search by any word in the prompt or caption, or filter by status: Draft, Approved, Scheduled, Published or Failed. Tick several drafts to approve, schedule, dismiss or delete them in one go.
Plan weeks ahead
Plan with AI drafts a run of posts in one go, so you don't have to start each one from scratch.
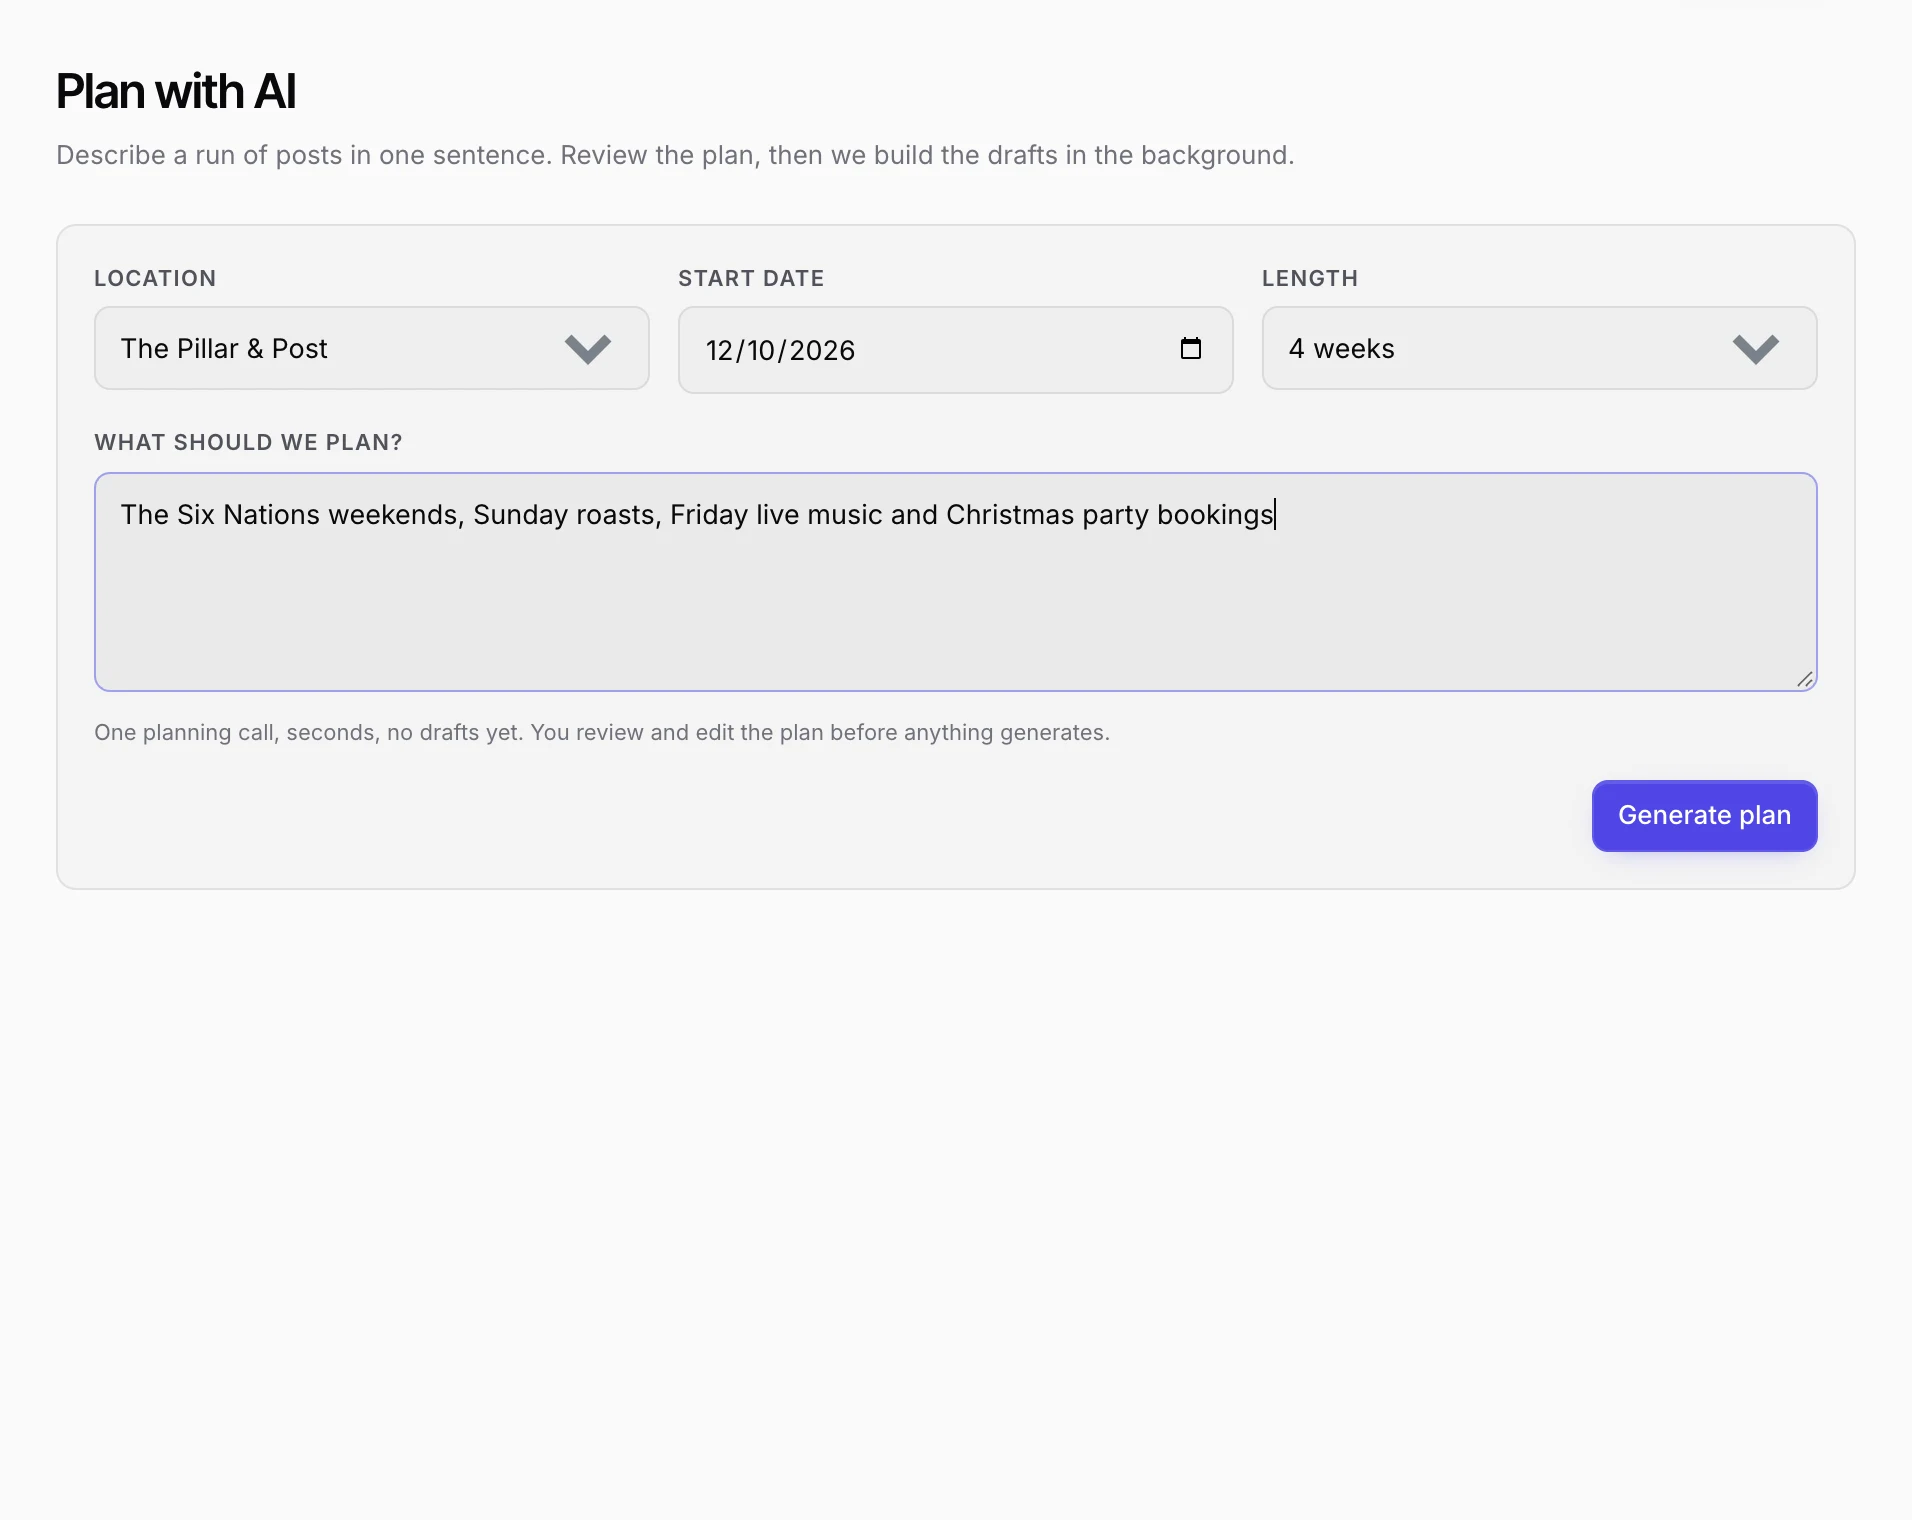
Pick the location, a start date and how many weeks to cover (1 to 6), then describe what's coming up: your events, regular specials, the fixtures you're showing. Click Generate plan.
You get a list of planned posts, each with a date, a time and a short brief. Change any of them, remove the ones you don't want, add your own with Add item, then click Approve and generate. The drafts are written in the background and land on the Approve page for review. Each one keeps its planned date and time when you approve it.
Get match-day posts automatically
If you show sport, open your location's Fixtures tab and add the competitions you screen, optionally narrowed to one team.
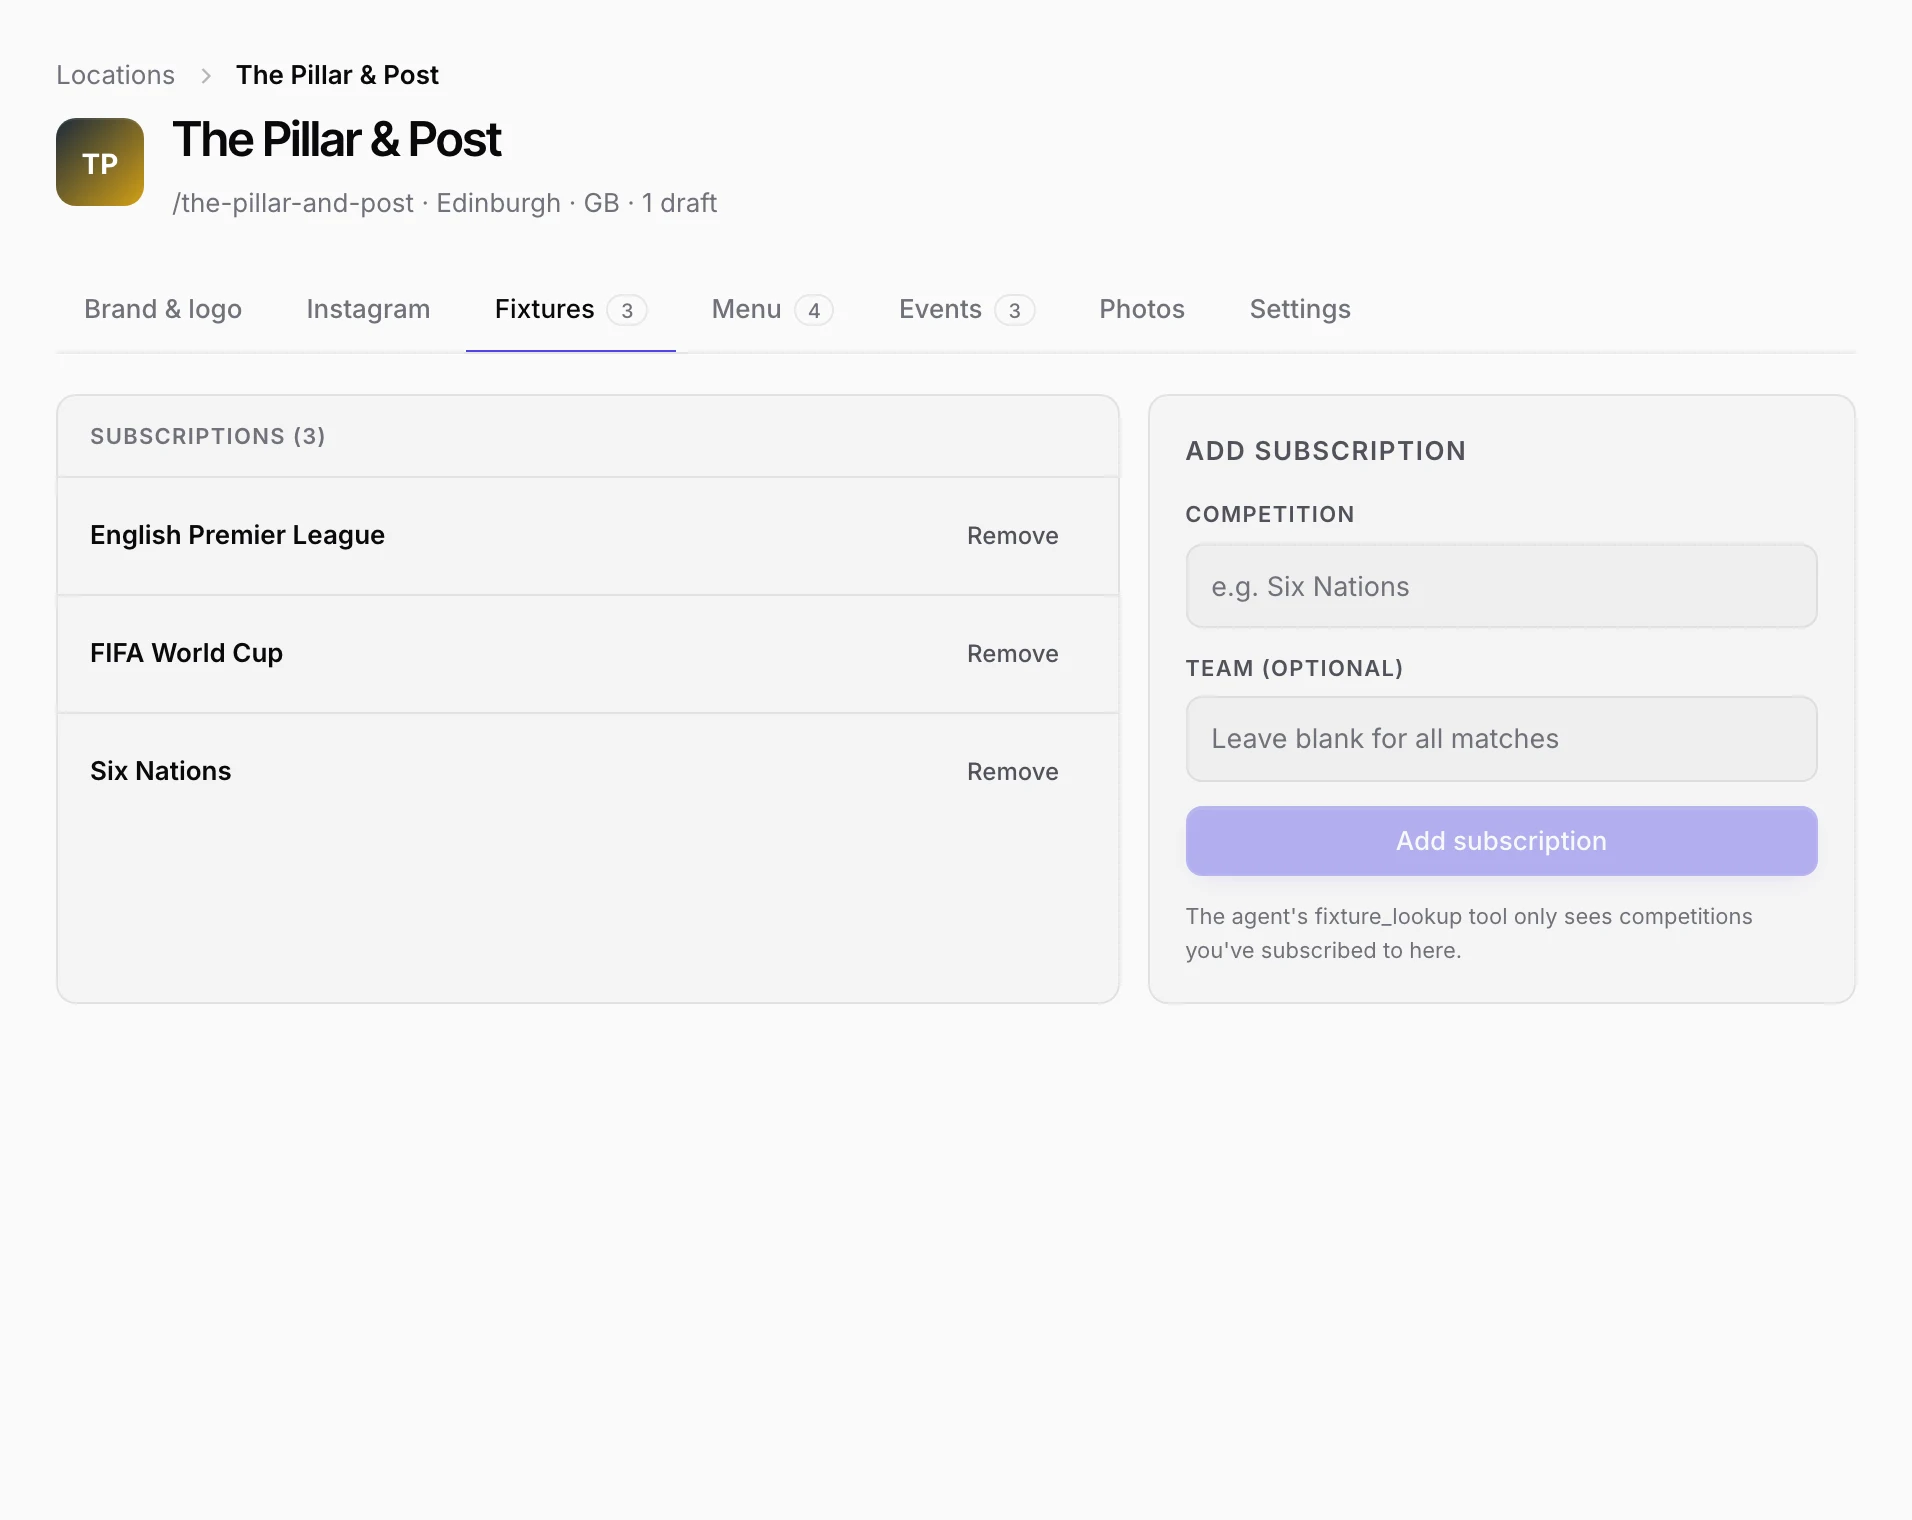
Venuesmith drafts the match-day posts for the fixtures in those competitions every week, and they arrive on the Approve page like any other draft.
See how posts perform
Insights shows how your Instagram posts did over the last 30 days: total reach and impressions, average saves per post and the number of posts published, then a trend chart, your top and bottom 3 posts by reach, and a table of every post you can sort.
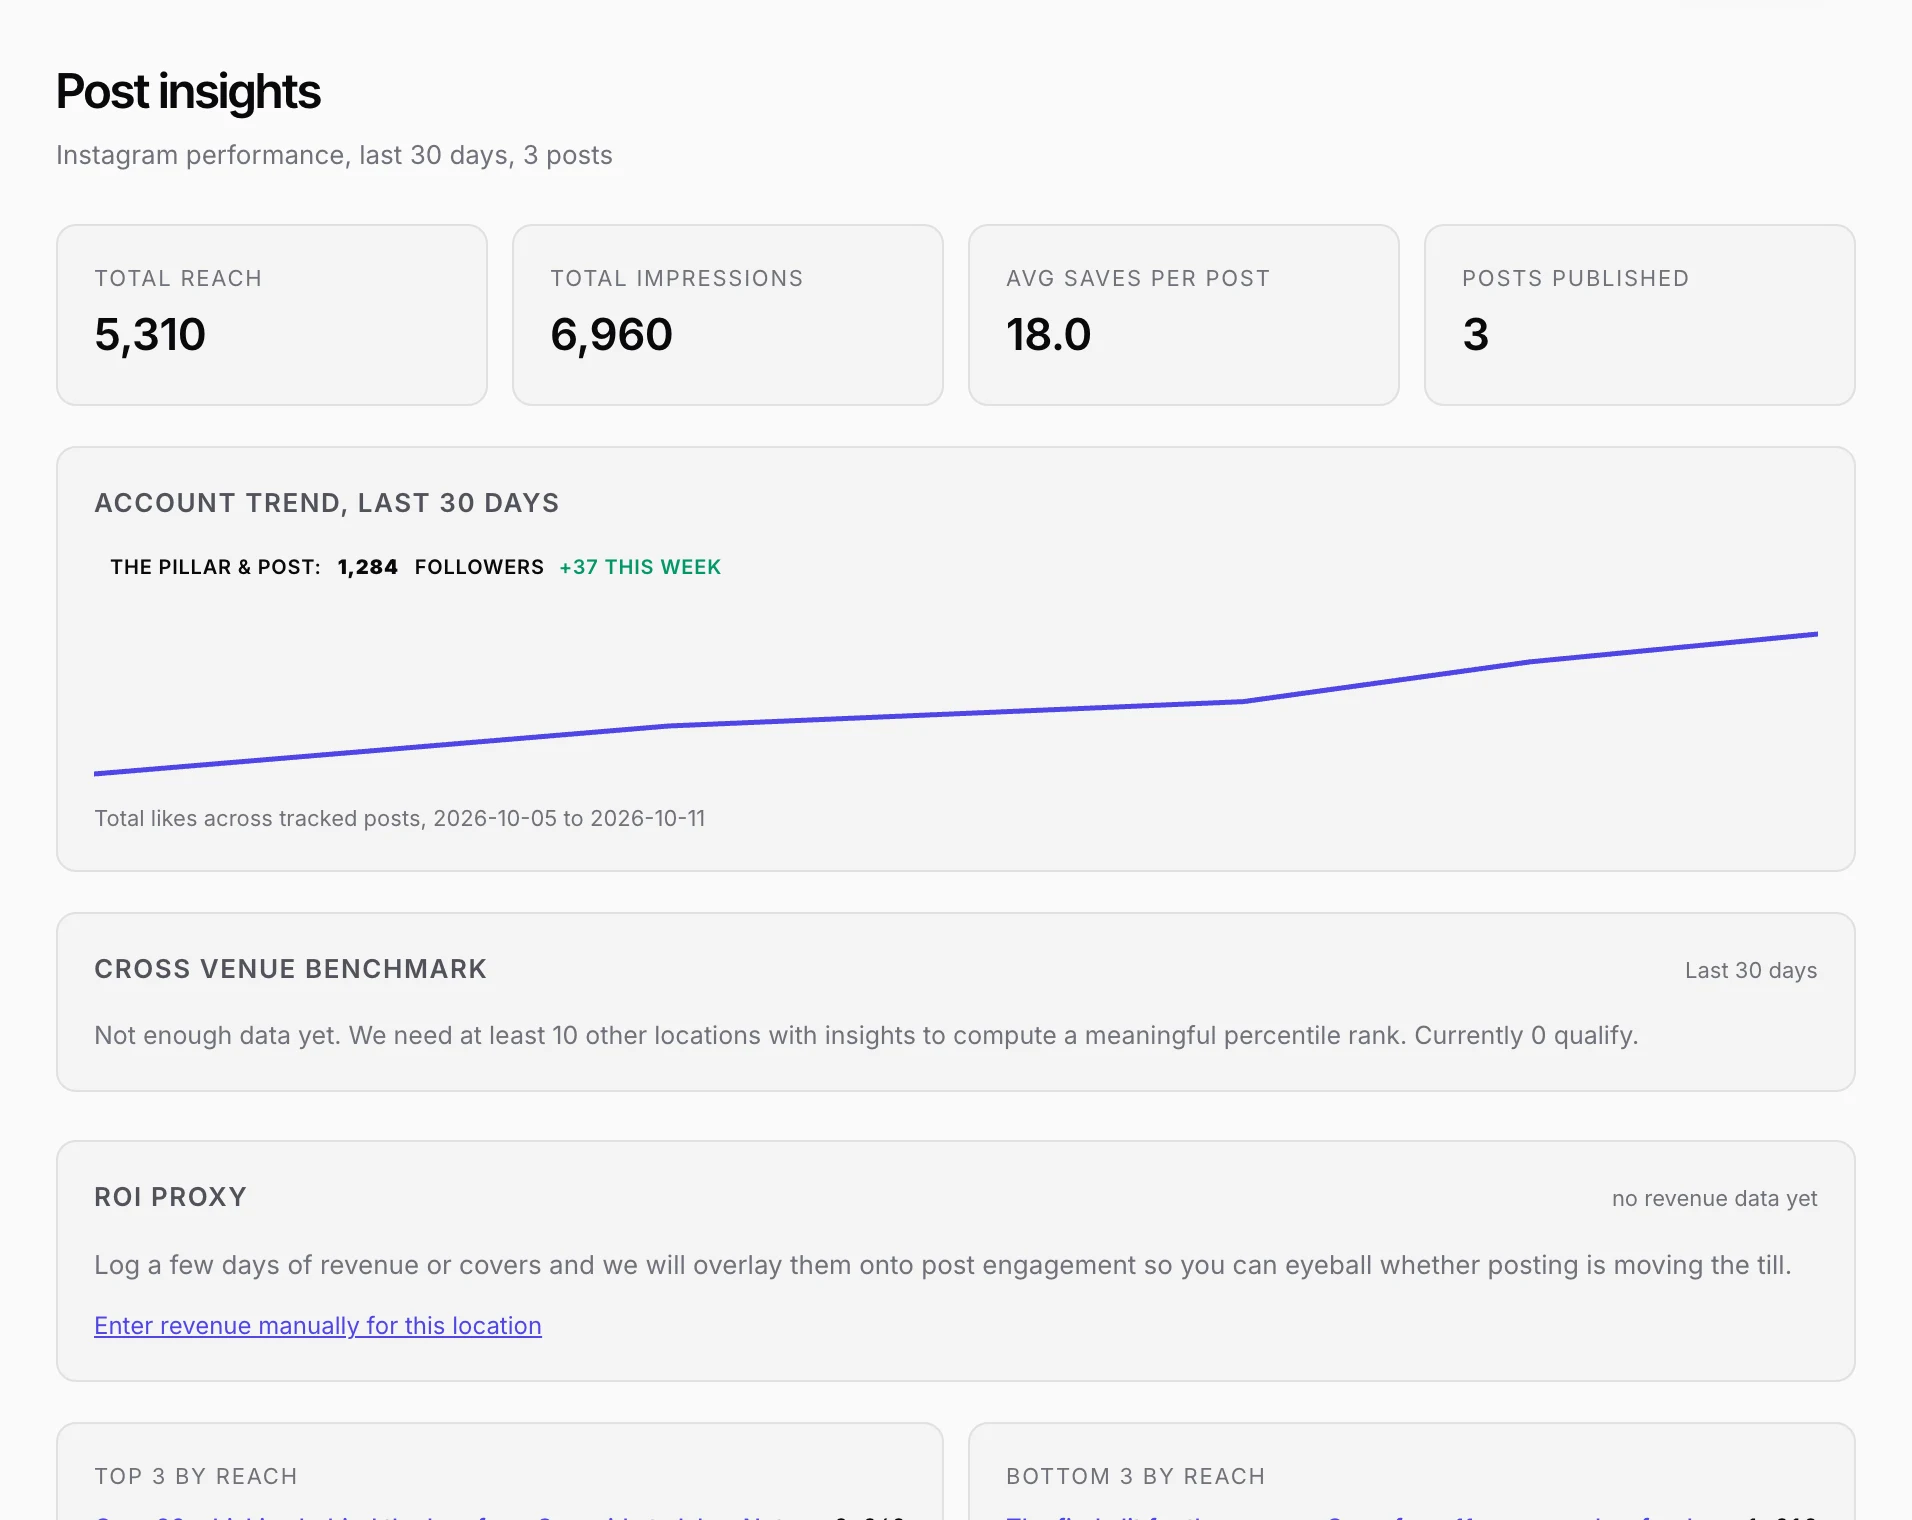
The numbers come from Instagram and update once a day, so a new post shows up the day after it goes out. Instagram needs to be connected for anything to appear here.
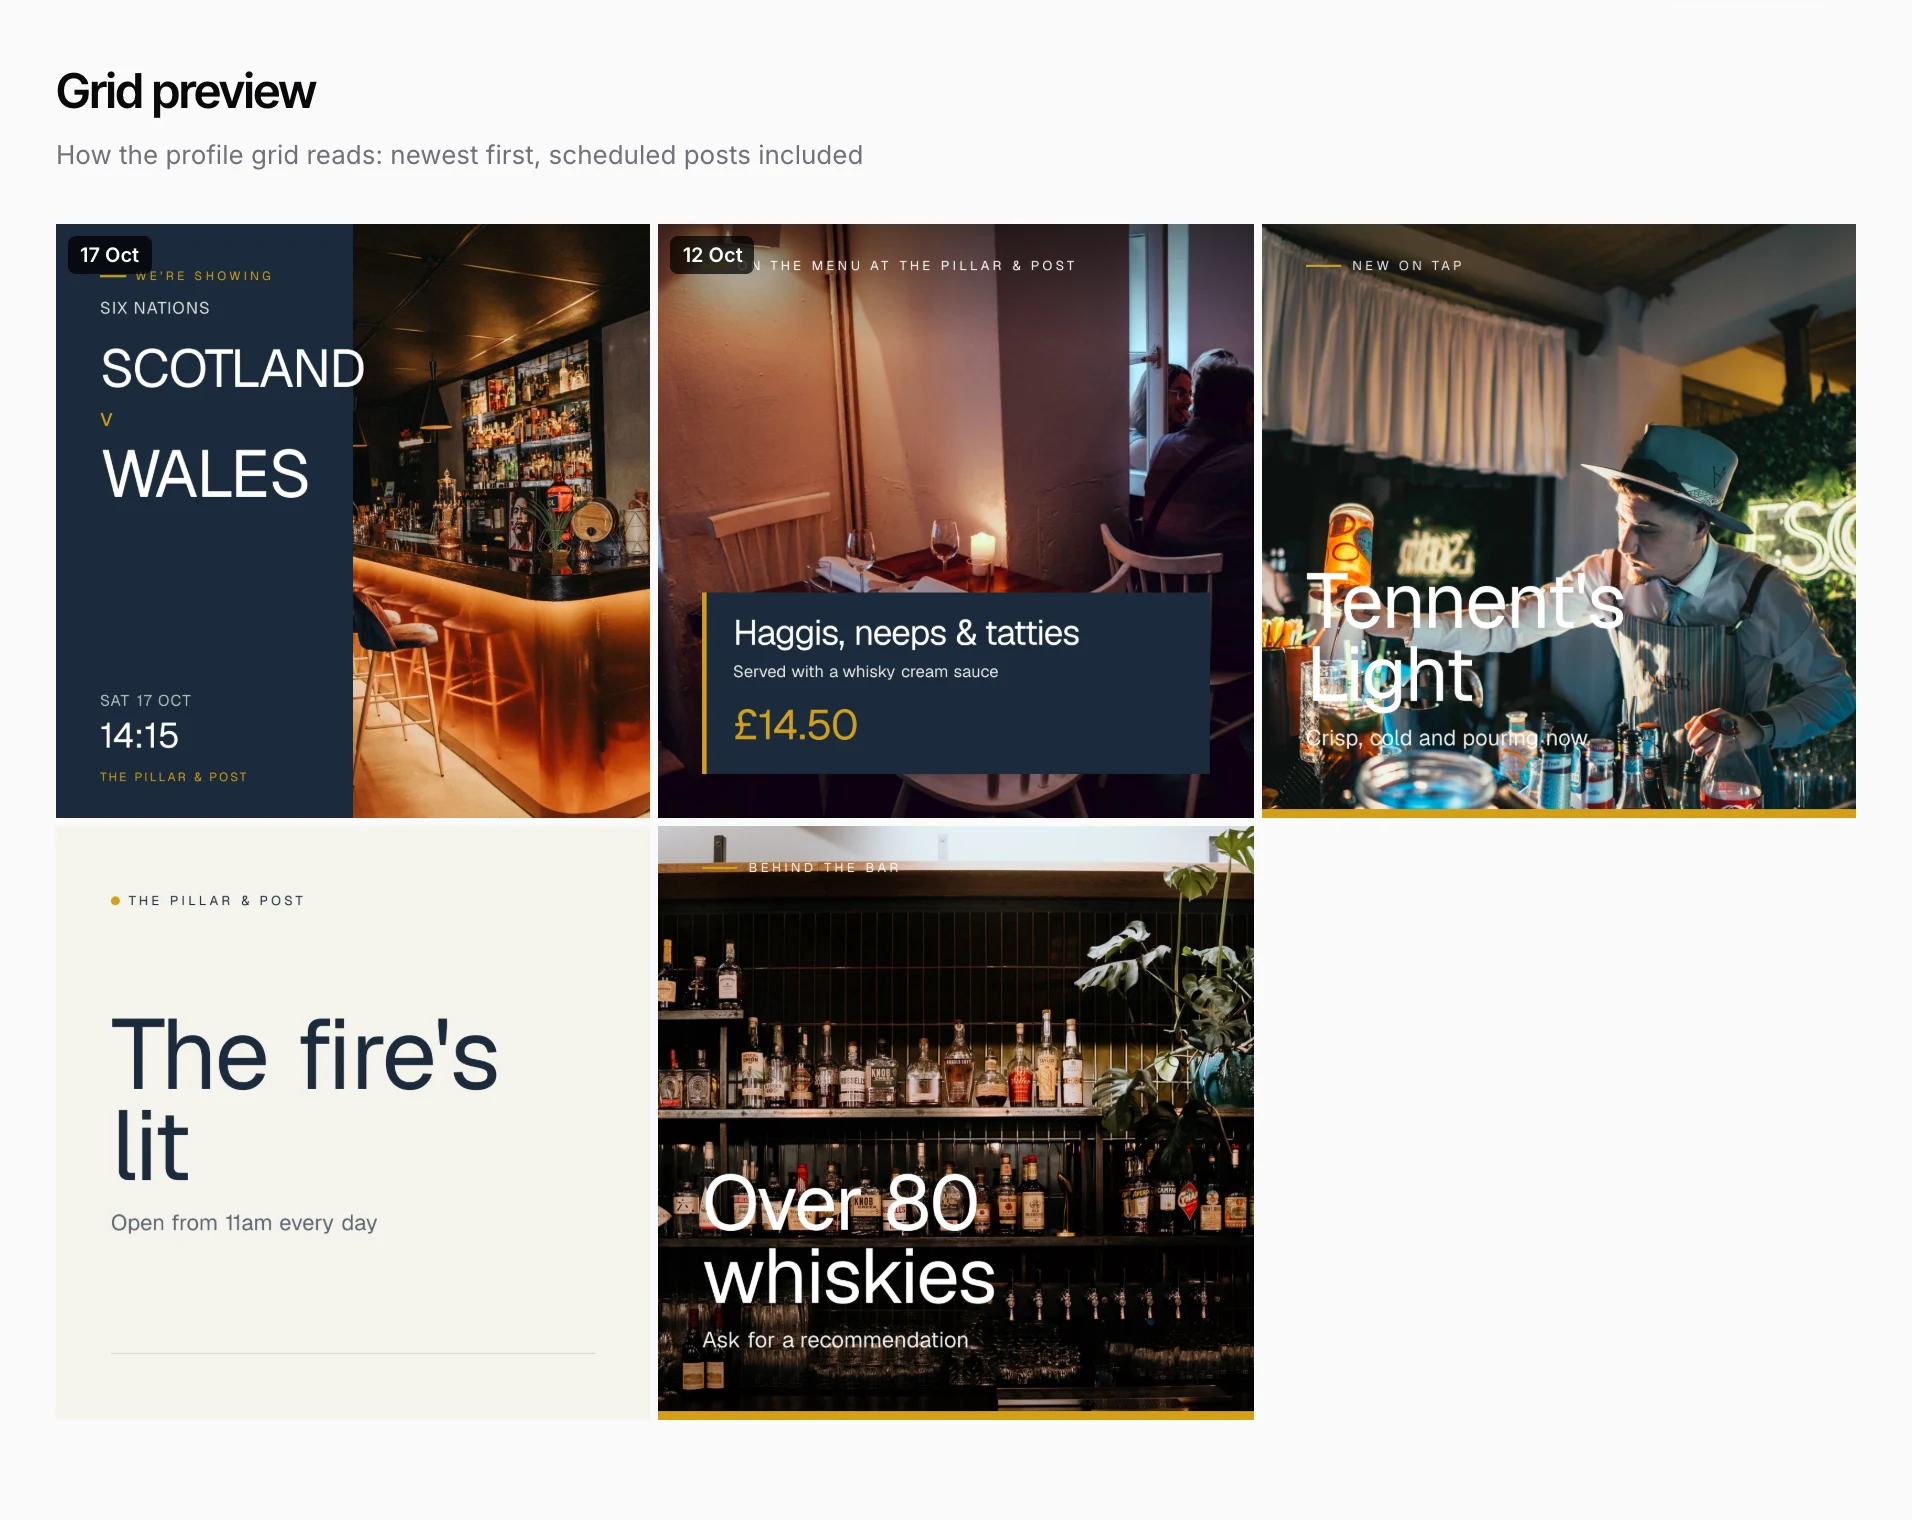
Grid shows your published and upcoming posts as they'll sit together on your Instagram profile, with the scheduled ones marked by date. It's a quick way to check the feed won't end up with three similar posts in a row.
Invite your team
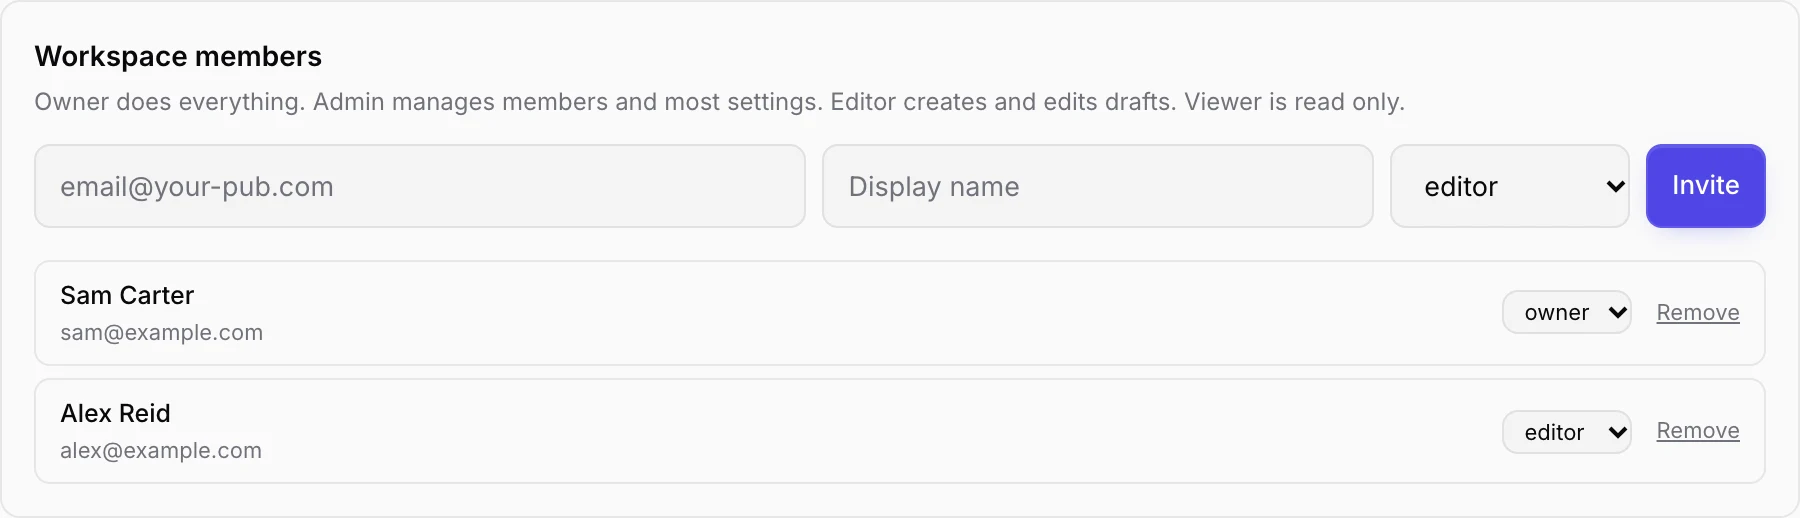
Open Settings and find Workspace members. Enter the person's email address and name, pick a role and click Invite.
| Role | What they can do |
|---|---|
| Owner | Everything, including billing and making other people owners |
| Admin | Manage members and settings, connect Instagram, approve and publish posts |
| Editor | Create and edit drafts, photos, menus and events |
| Viewer | Look around without changing anything |
You need to be an admin or owner to invite people, and only an owner can make someone else an owner. Change a member's role with the dropdown next to their name, or click Remove to take them off the workspace.
Billing and plans
Workspace owners can open Billing to see the current plan, how much of it you've used this month (locations, drafts and team members), the available plans and your invoices.
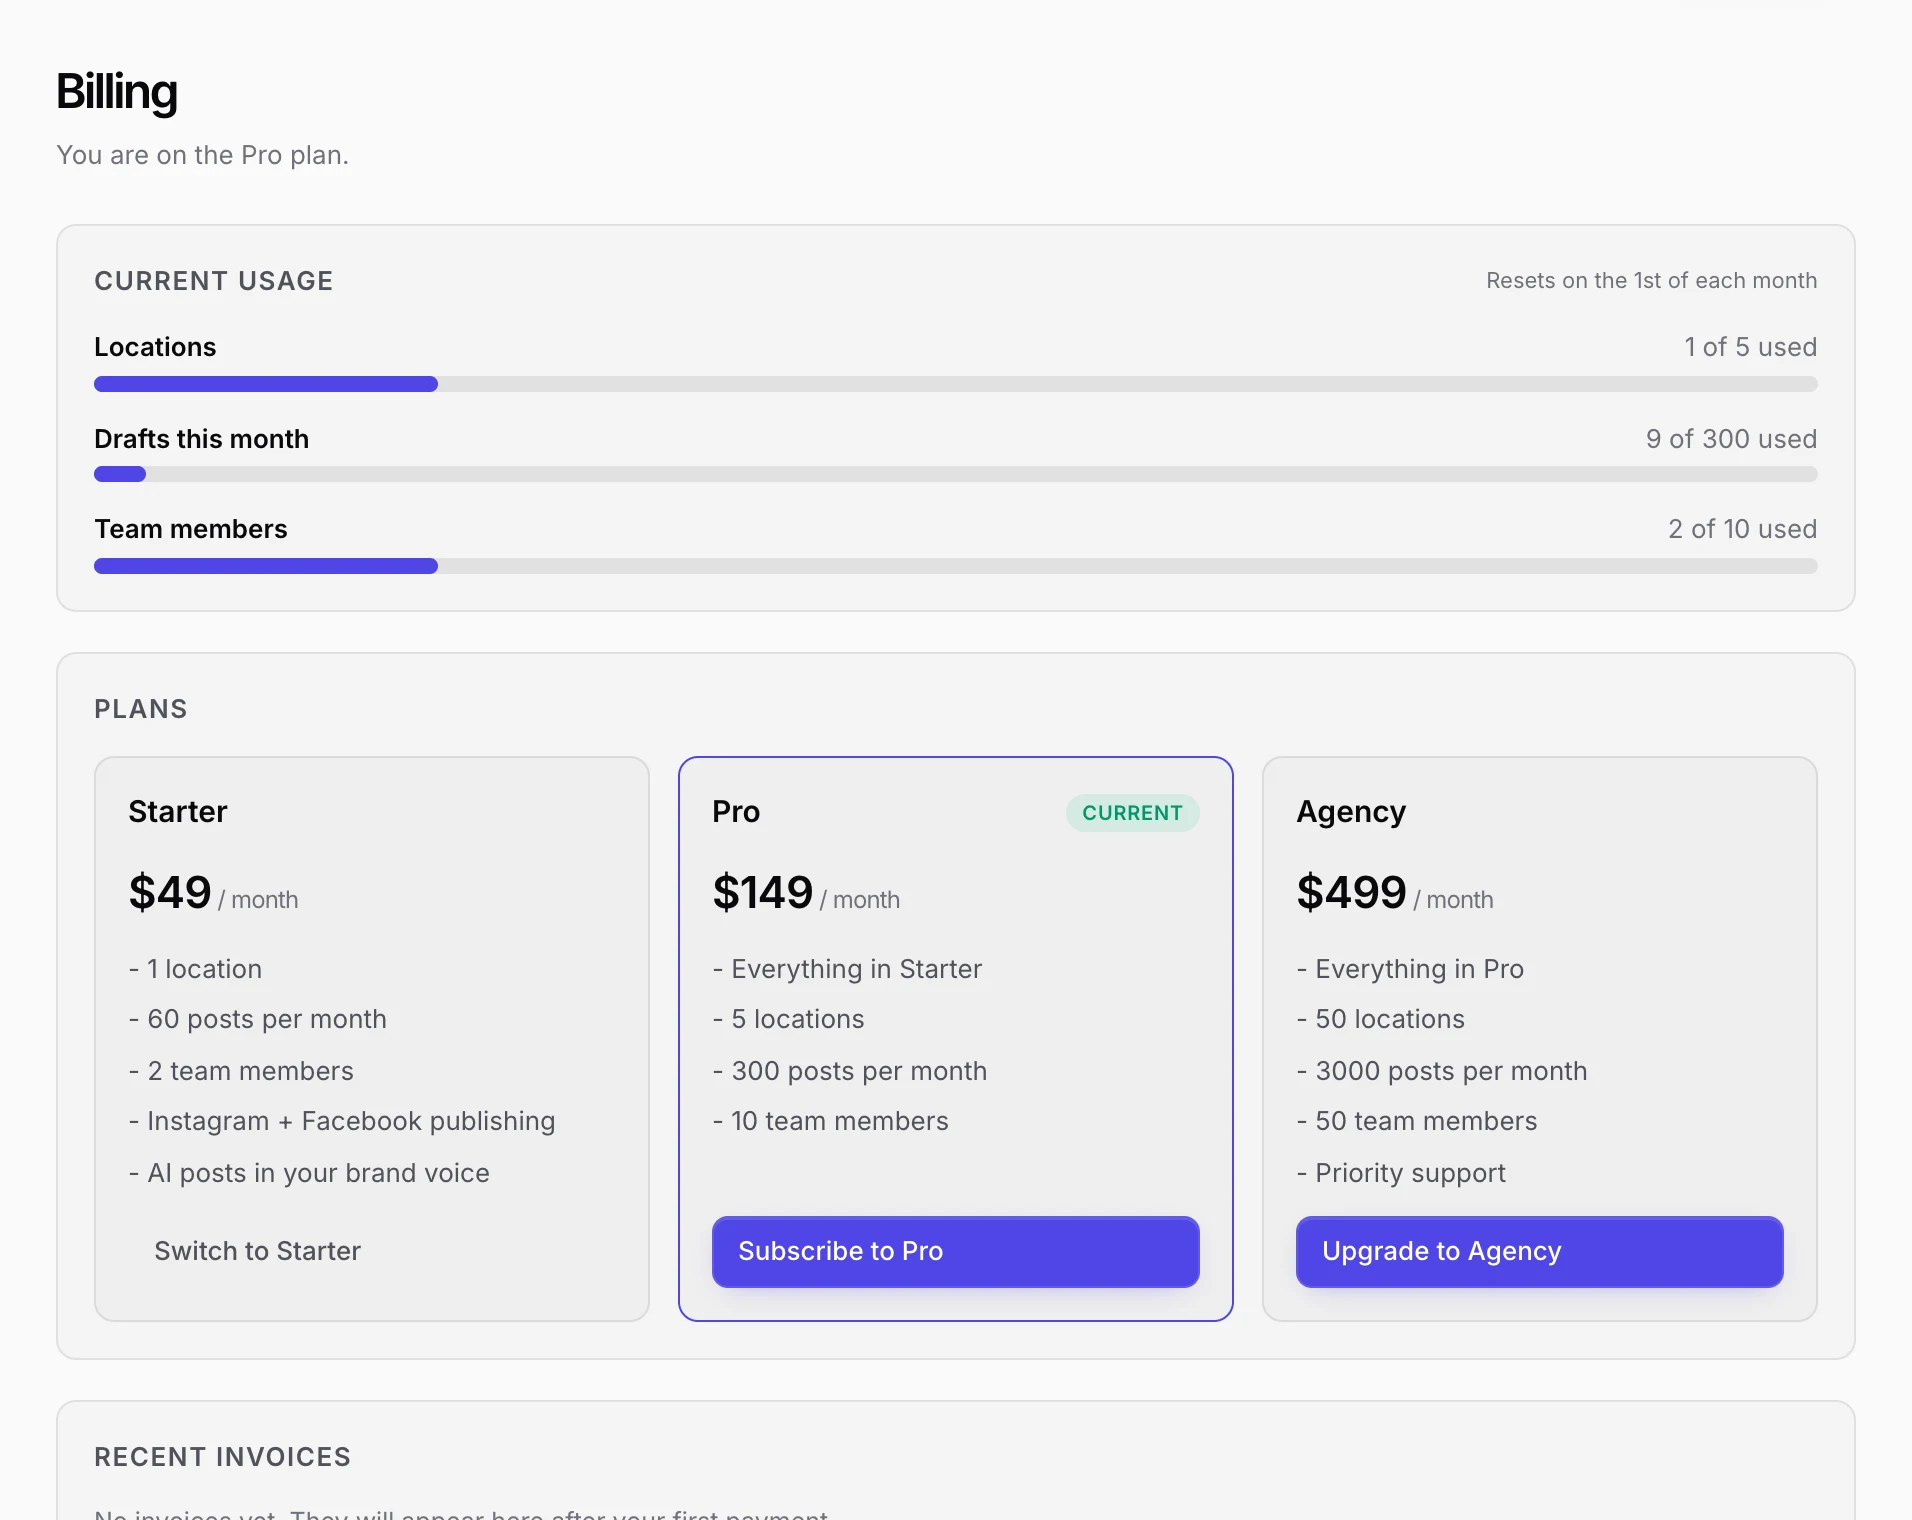
The plans differ in how many locations, posts a month and team members they include. Use the button on a plan to subscribe, upgrade or switch, and Manage billing to update your card or download invoices. When you get close to a limit, the dashboard shows a warning with an upgrade button.
Getting help
The Help page in the sidebar answers the common questions. For anything else, email hello@venuesmith.com with your workspace name and what went wrong. If a particular post is the problem, include its link (copy it from the address bar while the draft is open). We aim to reply within one business day.